Difference between revisions of "Hunters and Gatherers v2 Base Game"
| (22 intermediate revisions by the same user not shown) | |||
| Line 5: | Line 5: | ||
<!--T:2--> | <!--T:2--> | ||
[[File:Box_Hunters2_ZMG.png | <div class="toclimit-4"> | ||
{| style="float:right; text-align:center;" | |||
|- | |||
| [[File:Box_Hunters2_ZMG.png|right|200px]] | |||
|} | |||
__TOC__ | |||
</div> | |||
<!--T:5--> | <!--T:5--> | ||
| Line 23: | Line 30: | ||
<!--T:8--> | <!--T:8--> | ||
* '''79 land tiles''' (including one starting tile) with forests (including some forests with menhirs (*)), rivers, and lakes with fish, surrounded by grassland with animals. | * '''79 land tiles''' (including one starting tile) with forests (including some forests with menhirs (*)), rivers, and lakes with fish, surrounded by grassland with animals. | ||
{| | : {| | ||
|- valign="top" | |- valign="top" | ||
|[[File:Hunters_And_Gatherers2_LandTiles.png|frame|none|Examples of Land Tiles]] | |[[File:Hunters_And_Gatherers2_LandTiles.png|frame|none|Examples of Land Tiles]] | ||
||{{DottedFrameMessage| | ||{{DottedFrameMessage|align=left|text=(*) A '''menhir''' is a massive stone block erected by prehistoric humans,<br/>derived from "men" meaning "stone" and "hir" meaning "long". <ref>{{IconArrow}} The [[Hans im Glück|'''Hans im Glück''']] rules, when translated, simply state "A menhir is a towering prehistoric stone block ..." but does not mention the origin of the name, which is from the Breton language.</ref>}} | ||
|} | |} | ||
<!--T:9--> | <!--T:9--> | ||
{| | : {| | ||
|- valign="top" | |- valign="top" | ||
|[[File:HG2_Animals.png|frame|none|Animals that can be found on the tiles]] | |[[File:HG2_Animals.png|frame|none|Animals that can be found on the tiles]] | ||
| Line 36: | Line 43: | ||
<!--T:10--> | <!--T:10--> | ||
{| | : {| | ||
|- valign="top" | |- valign="top" | ||
|[[File:Hunters_And_Gatherers2_StartTile.png|frame|none|Start tile]] | |[[File:Hunters_And_Gatherers2_StartTile.png|frame|none|Start tile]] | ||
| Line 98: | Line 105: | ||
<!--T:27--> | <!--T:27--> | ||
<div class="wica-top-spacing wica-visible"> | <div class="wica-top-spacing wica-visible"> | ||
{{ | {{BeginTileList|width=900px}} | ||
{{StartBlock|250px|10px|10px}} | {{StartBlock|width=250px|padding-right=10px|padding-bottom=10px}} | ||
{{RulesPlacingTile| | {{RulesPlacingTile|header=fake-h4|title=1. Placing a land tile|rules= | ||
<div style="width:230px; max-width:230px; display:inline-block; height:150px;"> | <div style="width:230px; max-width:230px; display:inline-block; height:150px;"> | ||
<table> | <table> | ||
| Line 114: | Line 120: | ||
}} | }} | ||
{{EndBlock}} | {{EndBlock}} | ||
{{StartBlock|250px|10px|10px}} | {{StartBlock|width=250px|padding-right=10px|padding-bottom=10px}} | ||
{{RulesPlacingMeeple| | {{RulesPlacingMeeple|header=fake-h4|title=2. Placing a Meeple or a Hut|rules= | ||
<div style="width:230px; max-width:230px; display:inline-block; height:150px;"> | <div style="width:230px; max-width:230px; display:inline-block; height:150px;"> | ||
<table> | <table> | ||
| Line 129: | Line 134: | ||
}} | }} | ||
{{EndBlock}} | {{EndBlock}} | ||
{{StartBlock|250px|10px|10px}} | {{StartBlock|width=250px|padding-right=10px|padding-bottom=10px}} | ||
{{RulesScoring| | {{RulesScoring|header=fake-h4|title=3. Scoring a feature|rules= | ||
<div style="width:230px; max-width:230px; display:inline-block; height:150px;"> | <div style="width:230px; max-width:230px; display:inline-block; height:150px;"> | ||
<table> | <table> | ||
| Line 155: | Line 159: | ||
<!--T:30--> | <!--T:30--> | ||
{{RulesPlacingMeeple|title=2a. Place a Meeple as a Fisher on a River|rules= | {{RulesPlacingMeeple|title=2a. Place a Meeple as a Fisher on a River|rules= | ||
{{Tile|image=Hunters_And_Gatherers2_Figure_Meeple.png | <div style="margin-top: 1ex"> | ||
{{Tile|image=Hunters_And_Gatherers2_Figure_Meeple.png|text= | |||
<!--T:31--> | <!--T:31--> | ||
After placing a tile with a river, you may place 1 of your meeples '''on that river as a fisher''', but only if no other meeples are present on the same river. <br /> | |||
<!--T:32--> | <!--T:32--> | ||
You may place a meeple on a river with a hut. | You may place a meeple on a river with a hut. | ||
}} | }}</div> | ||
<!--T:33--> | <!--T:33--> | ||
| Line 176: | Line 181: | ||
<!--T:35--> | <!--T:35--> | ||
{{RulesPlacingMeeple| | {{RulesPlacingMeeple|title=2b. Place a Hut on a River or Lake|rules= | ||
<div style="margin-top: 1ex"> | |||
< | {{Tile|image=Hunters_And_Gatherers2_Figure_Hut.png|text= | ||
<!--T:36--> | <!--T:36--> | ||
| Line 190: | Line 193: | ||
<!--T:38--> | <!--T:38--> | ||
You can place a hut on a river where a meeple is already present. | You can place a hut on a river where a meeple is already present. | ||
}}</div> | |||
<!--T:39--> | <!--T:39--> | ||
Huts can be placed only on rivers or lakes. Huts '''remain where they are placed''' until the end of the game. | Huts can be placed only on rivers or lakes. Huts '''remain where they are placed''' until the end of the game. | ||
{{Tile|image=Hunters_And_Gatherers2_Ex04_PlaceHut.png|align=center|text=''{{ColorRed|You}} place a tile that continues 2 separate river systems.<br/>The left system has one of {{ColorBlue|Blue’s}} huts on it, so you place your hut on the right river system. {{ColorBlue|Blue’s}} fisher does not prevent placing this hut.'' | |||
}} | |||
}} | }} | ||
<!--T:40--> | <!--T:40--> | ||
{{RulesScoring| | {{RulesScoring|title=3. Scoring a river|rules= | ||
A river is completed when both ends are closed by lakes or forests, or when it loops back onto itself by connecting to the other end. When a river is completed, it is scored. If one of your meeples is on a river when it scores, you will score points from it, regardless of who placed the tile that completed the river. | A river is completed when both ends are closed by lakes or forests, or when it loops back onto itself by connecting to the other end. When a river is completed, it is scored. If one of your meeples is on a river when it scores, you will score points from it, regardless of who placed the tile that completed the river. | ||
<!--T:41--> | <!--T:41--> | ||
You score '''1 point''' for '''each tile''' comprising the completed river, and '''1 additional point''' for '''each fish''' present in the river and any lakes that close it. . After scoring, '''return the meeple(s) on the completed feature''' to their owner’s supply | You score '''1 point''' for '''each tile''' comprising the completed river, and '''1 additional point''' for '''each fish''' present in the river and any lakes that close it. . After scoring, '''return the meeple(s) on the completed feature''' to their owner’s supply. | ||
{{Tile|image=Hunters_And_Gatherers2_Ex05_ScoreRiver.png|align=center|text=''{{ColorBlue|Blue}} places a tile that completes a river.<br/>{{ColorRed|You}} have a meeple on the river, so you score '''5 points''': 3 points for the 3 tiles forming the river, and 2 for the 2 fish in the lakes.'' | |||
}} | |||
{{Tile|image=Hunters_And_Gatherers2_Ex06_ScoreboardMove.png|align=center|text=''{{ColorRed|You}} advance your meeple 5 spaces on the scoreboard.'' <br /> | |||
Players track their scores using the meeples placed on the scoreboard at the start of the game. When you score points, advance your meeple that many spaces on the scoreboard. If your meeple passes the “0” space on the scoreboard, take a scoring marker and place it in front of you with the “50” side face-up. If your meeple passes the “0” space again, flip the marker to the “100” side. | Players track their scores using the meeples placed on the scoreboard at the start of the game. When you score points, advance your meeple that many spaces on the scoreboard. If your meeple passes the “0” space on the scoreboard, take a scoring marker and place it in front of you with the “50” side face-up. If your meeple passes the “0” space again, flip the marker to the “100” side. | ||
}} | |||
{{Tile|image=Hunters_And_Gatherers2_Ex08_RemoveFisher.png|align=center|text=''{{ColorRed|You}} return your fisher to your supply.<br/>{{ColorBlue|Blue’s}} meeple stays on the other river, because that river has not scored yet.'' | |||
}} | |||
}} | }} | ||
| Line 236: | Line 222: | ||
<!--T:44--> | <!--T:44--> | ||
{{RulesPlacingTile| | {{RulesPlacingTile|title=1. Place a land tile|rules= | ||
<div style="margin-top: 1ex"> | |||
< | {{Tile|image=Hunters_And_Gatherers2_Ex09_Forest.png|align=center|text=As always, you must place a land tile so that it continues the landscape. <br /> | ||
A forest edge on a tile can be connected only to another forest edge. | |||
}} | |||
A forest edge on a tile can be connected only to another forest edge. | </div> | ||
</ | |||
}} | }} | ||
<!--T:45--> | <!--T:45--> | ||
{{RulesPlacingMeeple| | {{RulesPlacingMeeple|title=2. Place a Meeple as a Gatherer on a Forest|rules= | ||
You may place a meeple '''on a forest tile''' you just placed as a '''gatherer'''. As with rivers, a meeple can be placed on a forest only if there are no other meeples present on that forest. | You may place a meeple '''on a forest tile''' you just placed as a '''gatherer'''. As with rivers, a meeple can be placed on a forest only if there are no other meeples present on that forest. | ||
{{Tile|image=Hunters_And_Gatherers2_Ex10_PlaceGatherer.png|align=center|text=''{{ColorRed|You}} place a tile so that it continues the existing forest. Because there are no meeples currently on the forest, {{ColorRed|you}} can place a meeple on it.'' | |||
}} | |||
}} | }} | ||
{{RulesScoring|title=3. Score a completed forest|rules= | |||
{{RulesScoring| | ====== Normal Forest Scoring ====== <!--T:46--> | ||
<!--T:47--> | <!--T:47--> | ||
A forest is completed when it '''is surrounded by grassland and has no internal gaps'''. If your gatherer is the only gatherer on the completed forest, you score '''2 points''' for '''each tile''' comprising the completed forest. After scoring, return your meeple to your supply. | A forest is completed when it '''is surrounded by grassland and has no internal gaps'''. If your gatherer is the only gatherer on the completed forest, you score '''2 points''' for '''each tile''' comprising the completed forest. After scoring, return your meeple to your supply. | ||
{{Tile|image=Hunters_And_Gatherers2_Ex11_ScoreForest.png|align=center|text=''{{ColorRed|You}} complete a forest containing a menhir. {{ColorRed|You}} score 8 points because the forest comprises 4 <ref>{{IconArrow}} The [[Z-Man Games|'''ZMG''']] version of the rules said "8" tiles - [[Hans im Glück|'''HiG''']] version, and Dutch [[999 Games|'''999 Games''']] version, correctly state "4".</ref> tiles.''<br/> | |||
''Because {{ColorRed|you}} completed a forest with a menhir, {{ColorRed|you}} begin an extra turn.'' | |||
}} | |||
''Because {{ColorRed|you}} completed a forest with a menhir, {{ColorRed|you}} begin an extra turn.'' | ====== Menhirs ====== <!--T:134--> | ||
< | |||
[[File:HG2_Menhirs.png|frameless|right|x100px]] | [[File:HG2_Menhirs.png|frameless|right|x100px]] | ||
If you place a tile that completes a forest containing 1 or more menhirs, you take an extra turn<ref>{{IconWorld}} You don't have to have a follower in the forest to gain the extra turn, just be the one to close it.</ref>, during which you place 1 of the set-aside menhir tiles. After scoring completed features during your current turn, begin an extra turn, drawing and placing a menhir tile from the menhir tile stack. As during a normal turn, you can place a meeple or a hut on the tile you just placed, and score any completed features. If you complete another forest containing 1 or more menhirs during an extra turn, you '''do not''' take an additional extra turn. You take only 1 extra turn, even if there are multiple menhirs in a completed forest. If there are no menhir tiles remaining in the menhir tile stack, you cannot take an extra turn. | If you place a tile that completes a forest containing 1 or more menhirs, you take an extra turn<ref>{{IconWorld}} You don't have to have a follower in the forest to gain the extra turn, just be the one to close it.</ref>, during which you place 1 of the set-aside menhir tiles. After scoring completed features during your current turn, begin an extra turn, drawing and placing a menhir tile from the menhir tile stack. As during a normal turn, you can place a meeple or a hut on the tile you just placed, and score any completed features. If you complete another forest containing 1 or more menhirs during an extra turn, you '''do not''' take an additional extra turn. You take only 1 extra turn, even if there are multiple menhirs in a completed forest. If there are no menhir tiles remaining in the menhir tile stack, you cannot take an extra turn. | ||
<!--T:48--> | <!--T:48--> | ||
{{Tile|image=Hunters_And_Gatherers2_Ex12_ScoreForest2.png|align=center|text=''Because {{ColorRed|you}} completed a forest containing a menhir, you begin an extra turn, drawing and placing a menhir tile. <br /> | |||
<!--T:135--> | |||
{{ColorRed|You}} place the tile and place a gatherer on the forest.'' | |||
<!--T:49--> | <!--T:49--> | ||
''The forest is now complete, and {{ColorRed|you}} score 6 points for the 3 tiles that comprise the forest.<br/>The completed forest also contains a menhir, but you cannot begin an extra turn during an extra turn, so your turn ends as normal.'' | ''The forest is now complete, and {{ColorRed|you}} score 6 points for the 3 tiles that comprise the forest.<br/>The completed forest also contains a menhir, but you cannot begin an extra turn during an extra turn, so your turn ends as normal.'' | ||
}} | |||
<!--T:50--> | <!--T:50--> | ||
Menhir tiles are often more valuable than normal land tiles. Some menhir tiles have special actions associated with them; see [[#Menhir Tiles|Menhir Tiles]]. | |||
}} | }} | ||
| Line 301: | Line 267: | ||
<!--T:52--> | <!--T:52--> | ||
{{RulesPlacingTile| | {{RulesPlacingTile|title=1. Place a land tile|rules= | ||
<div style="margin-top: 1ex"> | |||
< | {{Tile|textbefore=As always, you must place a tile so that it continues the landscape. | ||
<!--T:53--> | <!--T:53--> | ||
| Line 310: | Line 275: | ||
<!--T:54--> | <!--T:54--> | ||
Grasslands are often divided by forests and rivers. | Grasslands are often divided by forests and rivers. | ||
|image=Hunters_And_Gatherers2_Ex13_Meadows.png|align=center|text=''This tile has 3 separate grasslands, divided by a river.'' | |||
}} | |||
</div> | |||
</ | |||
}} | }} | ||
<!--T:55--> | <!--T:55--> | ||
{{RulesPlacingMeeple| | {{RulesPlacingMeeple|title=2. Place a Meeple as a Hunter|rules= | ||
You may place a meeple '''on a grassland tile''' you just placed as a '''hunter'''. | |||
<!--T:56--> | <!--T:56--> | ||
| Line 331: | Line 293: | ||
<!--T:58--> | <!--T:58--> | ||
Hunters remain on their tiles '''until the end of the game''', and score points based on the number of animals on their grassland. | Hunters remain on their tiles '''until the end of the game''', and score points based on the number of animals on their grassland. | ||
{{Tile|image=Hunters_And_Gatherers2_Ex14_PlaceHunter.png|align=center|text=''{{ColorRed|You}} lay a hunter down on the grassland on the tile you just placed.<br/>The river separates this grassland from the other grassland with {{ColorBlue|Blue’s}} hunter.'' | |||
}} | |||
}} | }} | ||
| Line 346: | Line 303: | ||
<!--T:61--> | <!--T:61--> | ||
{{RulesPlacingTile| | {{RulesPlacingTile|title=1. Place a land tile|rules= | ||
* You must draw and place a tile such that it connects to 1 or more tiles. The tile must continue each feature it is connected to. | * You must draw and place a tile such that it connects to 1 or more tiles. The tile must continue each feature it is connected to. | ||
* In the rare event that you are unable to place the tile you drew, return that tile to the box and draw a new tile to replace it. | * In the rare event that you are unable to place the tile you drew, return that tile to the box and draw a new tile to replace it. | ||
}} | }} | ||
<!--T:62--> | <!--T:62--> | ||
{{RulesPlacingMeeple| | {{RulesPlacingMeeple|title=2. Place a Meeple or a Hut|rules= | ||
* A meeple or hut can be placed only on the tile you just placed. | * A meeple or hut can be placed only on the tile you just placed. | ||
* A meeple or hut can be placed only on a feature without another similar piece (meeple or hut). | * A meeple or hut can be placed only on a feature without another similar piece (meeple or hut). | ||
}} | }} | ||
<!--T:63--> | <!--T:63--> | ||
{{RulesScoring| | {{RulesScoring|title=3. Score completed features|rules= | ||
* A '''river''' is completed when both ends are closed by lakes or forests, or when it loops back onto itself. A river scores 1 point for each tile, and 1 point for each fish in the river and any lakes that close it. | * A '''river''' is completed when both ends are closed by lakes or forests, or when it loops back onto itself. A river scores 1 point for each tile, and 1 point for each fish in the river and any lakes that close it. | ||
* A '''forest''' is completed when it is surrounded by grassland and has no internal gaps. A forest scores 2 points for each tile. | * A '''forest''' is completed when it is surrounded by grassland and has no internal gaps. A forest scores 2 points for each tile. | ||
| Line 380: | Line 322: | ||
* If you place a tile that completes a '''forest containing 1 or more menhirs''', take an extra turn in which you draw and place a menhir tile. You cannot take multiple extra turns in a row. | * If you place a tile that completes a '''forest containing 1 or more menhirs''', take an extra turn in which you draw and place a menhir tile. You cannot take multiple extra turns in a row. | ||
* If multiple meeples are present on a single connected feature, the player with the most meeples on the feature scores points. In the event of a tie, all players tied for the most score the full points from the completed feature. For more information on how there can be multiple meeples on the same feature, see the following page. | * If multiple meeples are present on a single connected feature, the player with the most meeples on the feature scores points. In the event of a tie, all players tied for the most score the full points from the completed feature. For more information on how there can be multiple meeples on the same feature, see the following page. | ||
}} | }} | ||
| Line 388: | Line 327: | ||
<!--T:65--> | <!--T:65--> | ||
{{Tile|image=Hunters_And_Gatherers2_Ex15_SharedFeature1.png|align=center|text=''{{ColorRed|You}} could place your tile to extend the river with {{ColorBlue|Blue’s}} fisher, but {{ColorRed|you}} would not be able to place your fisher on this tile. So, {{ColorRed|you}} decide to place your tile like so, and place your fisher on the empty river.'' | |||
}} | |||
{{Tile|image=Hunters_And_Gatherers2_Ex16_SharedFeature2.png|align=center|text=''During a future turn, {{ColorRed|you}} draw this tile, and place it such that it connects the 2 rivers into a single larger river. Now there are 2 fishers on the same river. Because this river is now complete, it is scored. The river scores for 9 points (4 tiles and 5 fish), and {{ColorRed|you}} and {{ColorBlue|Blue}} both score the full 9 points.'' | |||
}} | |||
{{Tile|image=Hunters_And_Gatherers2_Ex17_SharedFeature3.png|align=center|text=''Hoping to claim this forest from {{ColorBlue|Blue}}, {{ColorRed|you}} place your tile like so, and place a gatherer on the forest. The other gatherers on tiles nearby do not affect this placement, because they are all on separate forests.'' | |||
}} | |||
{{Tile|image=Hunters_And_Gatherers2_Ex18_SharedFeature4.png|align=center|text=''During a future turn, {{ColorRed|you}} draw this tile and place it to connect the 3 previously separate forests into a single larger forest. Because {{ColorRed|you}} have the most meeples on this forest, {{ColorRed|you}} score 10 points for the completed forest, and {{ColorBlue|Blue}} does not score any points. All 3 meeples are returned to their owners’ supplies, and {{ColorRed|you}} take an extra turn because you completed a forest with a menhir.'' | |||
}} | |||
== End of the Game, Final Scoring, and Determining the Winner == <!--T:66--> | == End of the Game, Final Scoring, and Determining the Winner == <!--T:66--> | ||
| Line 429: | Line 351: | ||
<!--T:71--> | <!--T:71--> | ||
{{RulesScoring| | {{RulesScoring|title=Hut Scoring example|rules= | ||
[[File:Hunters_And_Gatherers2_Ex19_HutScore.png]] | [[File:Hunters_And_Gatherers2_Ex19_HutScore.png]] | ||
| Line 461: | Line 382: | ||
<!--T:81--> | <!--T:81--> | ||
{{RulesScoring| | {{RulesScoring|title=Grassland Scoring example|rules= | ||
[[File:Hunters_And_Gatherers2_Ex21_GrasslandScore.jpg]] | |||
<!--T:82--> | <!--T:82--> | ||
| Line 510: | Line 431: | ||
<!--T:97--> | <!--T:97--> | ||
{| | {{Tile|image=Hunters_And_Gatherers2_Tile_Logboat.png|text=When you place the '''logboat''', you immediately score '''2 points per lake''' in this tile’s river system, including this tile. <br /><div> | ||
| When you place the '''logboat''', you immediately score '''2 points per lake''' in this tile’s river system, including this tile. | |||
<!--T:98--> | <!--T:98--> | ||
This tile is not affected by huts present on the river system. | This tile is not affected by huts present on the river system. | ||
</div> | |||
}} | |||
<!--T:99--> | <!--T:99--> | ||
{{RulesScoring| | {{RulesScoring|title=Logboat Scoring example|rules= | ||
{{Tile|image=Hunters_And_Gatherers2_Ex22_LogboatScore.png|align=center|text=''{{ColorRed|You}} place the '''logboat''' and score '''8 points''' for the 4 <ref> | |||
{{IconArrow}} | |||
The [[Z-Man Games|'''Z-Man Games''']] rules said "8 points" and "3" lakes - the [[Hans im Glück|'''Hans im Glück''']] version correctly stated "4" lakes. | |||
</ref> lakes in the river system.'' <br /> | |||
<!--T:100--> | <!--T:100--> | ||
''Then {{ColorRed|you}} place a fisher, and score 5 points from the completed river.''<ref>{{IconWorld}} Or you could score 7 points by placing your fisher on the river occupied by {{ColorBlue|Blue's}} Hut! There's an extra fish on the river, hidden by the hut. Both [[Hans im Glück|'''HiG''']] and [[Z-Man Games|'''ZMG''']] versions don't consider this.</ref> | ''Then {{ColorRed|you}} place a fisher, and score 5 points from the completed river.'' <ref> | ||
{{IconWorld}} | |||
Or you could score 7 points by placing your fisher on the river occupied by {{ColorBlue|Blue's}} Hut! There's an extra fish on the river, hidden by the hut. Both [[Hans im Glück|'''HiG''']] and [[Z-Man Games|'''ZMG''']] versions don't consider this. | |||
</ref> | |||
}} | |||
}} | }} | ||
<!--T:101--> | <!--T:101--> | ||
{| | {{Tile|image=Hunters_And_Gatherers2_Tile_HuntingTrap.png|text=When you place the '''hunting trap''', you must immediately resolve a minor grassland scoring. | ||
| When you place the '''hunting trap''', you must immediately resolve a minor grassland scoring. | |||
<!--T:102--> | <!--T:102--> | ||
| Line 544: | Line 461: | ||
<!--T:103--> | <!--T:103--> | ||
All animals score points as they would during final scoring, including saber-toothed tigers cancelling out deer. Cover all animals scored this way with covering markers. These animals '''are ignored during final scoring'''. | All animals score points as they would during final scoring, including saber-toothed tigers cancelling out deer. Cover all animals scored this way with covering markers. These animals '''are ignored during final scoring'''. | ||
}} | |||
<!--T:104--> | <!--T:104--> | ||
{{RulesScoring| | {{RulesScoring|title=Hunting Trap example|rules= | ||
{{Tile|image=Hunters_And_Gatherers2_Ex23_HuntingTrapScore.png|align=center|text=''{{ColorRed|You}} place the '''hunting trap''' and score.'' | |||
<!--T:105--> | <!--T:105--> | ||
| Line 560: | Line 474: | ||
<!--T:107--> | <!--T:107--> | ||
''Cover all scored animals (2).'' | ''Cover all scored animals (2).'' | ||
}} | |||
}} | }} | ||
<!--T:108--> | <!--T:108--> | ||
{| | {{Tile|image=Hunters_And_Gatherers2_Tile_Shaman.png|text=When you place the '''shaman''', you may <ref>{{IconArrow}} An early version of the [[Z-Man Games|'''ZMG''']] rules stated that you "'''must'''" remove 1 of your meeples from play, rather than "'''may'''".</ref> immediately '''return 1 of your meeples''' to your supply without scoring points. <br /><div> | ||
| When you place the '''shaman''', you may <ref>{{IconArrow}} An early version of the [[Z-Man Games|'''ZMG''']] rules stated that you "'''must'''" remove 1 of your meeples from play, rather than "'''may'''".</ref> immediately '''return 1 of your meeples''' to your supply without scoring points. | |||
<!--T:109--> | <!--T:109--> | ||
It does not matter which tile this meeple is returned from. | It does not matter which tile this meeple is returned from. | ||
</div> | |||
}} | |||
=== Menhir tiles that affect final scoring === <!--T:110--> | === Menhir tiles that affect final scoring === <!--T:110--> | ||
| Line 581: | Line 492: | ||
<!--T:112--> | <!--T:112--> | ||
{| | {{Tile|image=Hunters_And_Gatherers2_Tile_PitTrap.png|text=The '''pit trap''' modifies the scoring of the connected grassland. | ||
<!--T:113--> | <!--T:113--> | ||
| Line 591: | Line 499: | ||
<!--T:114--> | <!--T:114--> | ||
Tiger still cancel our deer as normal, although the scoring player can choose to cover deer further away from the trap. | Tiger still cancel our deer as normal, although the scoring player can choose to cover deer further away from the trap. | ||
}} | |||
<!--T:115--> | <!--T:115--> | ||
{{RulesScoring| | {{RulesScoring|title=Pit Trap example|rules= | ||
{{Tile|image=Hunters_And_Gatherers2_Ex24_PitTrapScore.png|align=center|text=''{{ColorRed|You}} score the grassland with the pit trap.'' | |||
<!--T:116--> | <!--T:116--> | ||
| Line 603: | Line 509: | ||
<!--T:117--> | <!--T:117--> | ||
''The deer on the right does not score with this grassland, because it is on a separate grassland.'' | ''The deer on the right does not score with this grassland, because it is on a separate grassland.'' | ||
}} | |||
<!--T:118--> | <!--T:118--> | ||
| Line 613: | Line 516: | ||
<!--T:119--> | <!--T:119--> | ||
{| | {{Tile|image=Hunters_And_Gatherers2_Tile_Fire.png|text=The '''wildfire chases away all tigers''' on the connected grassland. | ||
<!--T:120--> | <!--T:120--> | ||
When resolving final scoring, cover all tigers on that grassland, but do not cover any deer. | When resolving final scoring, cover all tigers on that grassland, but do not cover any deer. | ||
}} | |||
<!--T:121--> | <!--T:121--> | ||
{| | {{Tile|image=Hunters_And_Gatherers2_Tile_Raft.png|text=The '''raft''' makes its river system more valuable. | ||
<!--T:122--> | <!--T:122--> | ||
In addition to scoring 1 point for each fish in this river system, the scoring player also scores '''1 point for each lake''' in the system. | In addition to scoring 1 point for each fish in this river system, the scoring player also scores '''1 point for each lake''' in the system. | ||
}} | |||
== Credits == <!--T:123--> | == Credits == <!--T:123--> | ||
| Line 651: | Line 548: | ||
'''Total Regular Tiles: 79''' | '''Total Regular Tiles: 79''' | ||
{{BeginTileList|width=100%}} | {{BeginTileList|width=100%}} | ||
{{Tile|Hunters_And_Gatherers2_Tile_01.jpg|count=1}} | {{Tile|image=Hunters_And_Gatherers2_Tile_01.jpg|count=1}} | ||
{{Tile|Hunters_And_Gatherers2_Tile_02.jpg|count=1}} | {{Tile|image=Hunters_And_Gatherers2_Tile_02.jpg|count=1}} | ||
{{Tile|Hunters_And_Gatherers2_Tile_03.jpg|count=1}} | {{Tile|image=Hunters_And_Gatherers2_Tile_03.jpg|count=1}} | ||
{{Tile|Hunters_And_Gatherers2_Tile_04.jpg|count=1}} | {{Tile|image=Hunters_And_Gatherers2_Tile_04.jpg|count=1}} | ||
{{Tile|Hunters_And_Gatherers2_Tile_05.jpg|count=1}} | {{Tile|image=Hunters_And_Gatherers2_Tile_05.jpg|count=1}} | ||
{{Tile|Hunters_And_Gatherers2_Tile_06.jpg|count=1}} | {{Tile|image=Hunters_And_Gatherers2_Tile_06.jpg|count=1}} | ||
{{Tile|Hunters_And_Gatherers2_Tile_07.jpg|count=1}} | {{Tile|image=Hunters_And_Gatherers2_Tile_07.jpg|count=1}} | ||
{{Tile|Hunters_And_Gatherers2_Tile_08.jpg|count=1}} | {{Tile|image=Hunters_And_Gatherers2_Tile_08.jpg|count=1}} | ||
{{Tile|Hunters_And_Gatherers2_Tile_09.jpg|count=1}} | {{Tile|image=Hunters_And_Gatherers2_Tile_09.jpg|count=1}} | ||
{{Tile|Hunters_And_Gatherers2_Tile_10.jpg|count=1}} | {{Tile|image=Hunters_And_Gatherers2_Tile_10.jpg|count=1}} | ||
{{Tile|Hunters_And_Gatherers2_Tile_11.jpg|count=1}} | {{Tile|image=Hunters_And_Gatherers2_Tile_11.jpg|count=1}} | ||
{{Tile|Hunters_And_Gatherers2_Tile_12.jpg|count=1}} | {{Tile|image=Hunters_And_Gatherers2_Tile_12.jpg|count=1}} | ||
{{Tile|Hunters_And_Gatherers2_Tile_13.jpg|count=1}} | {{Tile|image=Hunters_And_Gatherers2_Tile_13.jpg|count=1}} | ||
{{Tile|Hunters_And_Gatherers2_Tile_14.jpg|count=1}} | {{Tile|image=Hunters_And_Gatherers2_Tile_14.jpg|count=1}} | ||
{{Tile|Hunters_And_Gatherers2_Tile_15.jpg|count=1}} | {{Tile|image=Hunters_And_Gatherers2_Tile_15.jpg|count=1}} | ||
{{Tile|Hunters_And_Gatherers2_Tile_16.jpg|count=1}} | {{Tile|image=Hunters_And_Gatherers2_Tile_16.jpg|count=1}} | ||
{{Tile|Hunters_And_Gatherers2_Tile_17.jpg|count=1}} | {{Tile|image=Hunters_And_Gatherers2_Tile_17.jpg|count=1}} | ||
{{Tile|Hunters_And_Gatherers2_Tile_18.jpg|count=1}} | {{Tile|image=Hunters_And_Gatherers2_Tile_18.jpg|count=1}} | ||
{{Tile|Hunters_And_Gatherers2_Tile_19.jpg|count=1}} | {{Tile|image=Hunters_And_Gatherers2_Tile_19.jpg|count=1}} | ||
{{Tile|Hunters_And_Gatherers2_Tile_20.jpg|count=1}} | {{Tile|image=Hunters_And_Gatherers2_Tile_20.jpg|count=1}} | ||
{{Tile|Hunters_And_Gatherers2_Tile_21.jpg|count=1}} | {{Tile|image=Hunters_And_Gatherers2_Tile_21.jpg|count=1}} | ||
{{Tile|Hunters_And_Gatherers2_Tile_22.jpg|count=1}} | {{Tile|image=Hunters_And_Gatherers2_Tile_22.jpg|count=1}} | ||
{{Tile|Hunters_And_Gatherers2_Tile_23.jpg|count=1}} | {{Tile|image=Hunters_And_Gatherers2_Tile_23.jpg|count=1}} | ||
{{Tile|Hunters_And_Gatherers2_Tile_24.jpg|count=1}} | {{Tile|image=Hunters_And_Gatherers2_Tile_24.jpg|count=1}} | ||
{{Tile|Hunters_And_Gatherers2_Tile_25.jpg|count=1}} | {{Tile|image=Hunters_And_Gatherers2_Tile_25.jpg|count=1}} | ||
{{Tile|Hunters_And_Gatherers2_Tile_26.jpg|count=1}} | {{Tile|image=Hunters_And_Gatherers2_Tile_26.jpg|count=1}} | ||
{{Tile|Hunters_And_Gatherers2_Tile_27.jpg|count=1}} | {{Tile|image=Hunters_And_Gatherers2_Tile_27.jpg|count=1}} | ||
{{Tile|Hunters_And_Gatherers2_Tile_28.jpg|count=1}} | {{Tile|image=Hunters_And_Gatherers2_Tile_28.jpg|count=1}} | ||
{{Tile|Hunters_And_Gatherers2_Tile_29.jpg|count=1}} | {{Tile|image=Hunters_And_Gatherers2_Tile_29.jpg|count=1}} | ||
{{Tile|Hunters_And_Gatherers2_Tile_30.jpg|count=1}} | {{Tile|image=Hunters_And_Gatherers2_Tile_30.jpg|count=1}} | ||
{{Tile|Hunters_And_Gatherers2_Tile_31.jpg|count=1}} | {{Tile|image=Hunters_And_Gatherers2_Tile_31.jpg|count=1}} | ||
{{Tile|Hunters_And_Gatherers2_Tile_32.jpg|count=1}} | {{Tile|image=Hunters_And_Gatherers2_Tile_32.jpg|count=1}} | ||
{{Tile|Hunters_And_Gatherers2_Tile_33.jpg|count=1}} | {{Tile|image=Hunters_And_Gatherers2_Tile_33.jpg|count=1}} | ||
{{Tile|Hunters_And_Gatherers2_Tile_34.jpg|count=1}} | {{Tile|image=Hunters_And_Gatherers2_Tile_34.jpg|count=1}} | ||
{{Tile|Hunters_And_Gatherers2_Tile_35.jpg|count=1}} | {{Tile|image=Hunters_And_Gatherers2_Tile_35.jpg|count=1}} | ||
{{Tile|Hunters_And_Gatherers2_Tile_36.jpg|count=1}} | {{Tile|image=Hunters_And_Gatherers2_Tile_36.jpg|count=1}} | ||
{{Tile|Hunters_And_Gatherers2_Tile_37.jpg|count=1}} | {{Tile|image=Hunters_And_Gatherers2_Tile_37.jpg|count=1}} | ||
{{Tile|Hunters_And_Gatherers2_Tile_38.jpg|count=1}} | {{Tile|image=Hunters_And_Gatherers2_Tile_38.jpg|count=1}} | ||
{{Tile|Hunters_And_Gatherers2_Tile_39.jpg|count=1}} | {{Tile|image=Hunters_And_Gatherers2_Tile_39.jpg|count=1}} | ||
{{Tile|Hunters_And_Gatherers2_Tile_40.jpg|count=1}} | {{Tile|image=Hunters_And_Gatherers2_Tile_40.jpg|count=1}} | ||
{{Tile|Hunters_And_Gatherers2_Tile_41.jpg|count=1}} | {{Tile|image=Hunters_And_Gatherers2_Tile_41.jpg|count=1}} | ||
{{Tile|Hunters_And_Gatherers2_Tile_42.jpg|count=1}} | {{Tile|image=Hunters_And_Gatherers2_Tile_42.jpg|count=1}} | ||
{{Tile|Hunters_And_Gatherers2_Tile_43.jpg|count=1}} | {{Tile|image=Hunters_And_Gatherers2_Tile_43.jpg|count=1}} | ||
{{Tile|Hunters_And_Gatherers2_Tile_44.jpg|count=1}} | {{Tile|image=Hunters_And_Gatherers2_Tile_44.jpg|count=1}} | ||
{{Tile|Hunters_And_Gatherers2_Tile_45.jpg|count=1}} | {{Tile|image=Hunters_And_Gatherers2_Tile_45.jpg|count=1}} | ||
{{Tile|Hunters_And_Gatherers2_Tile_46.jpg|count=1}} | {{Tile|image=Hunters_And_Gatherers2_Tile_46.jpg|count=1}} | ||
{{Tile|Hunters_And_Gatherers2_Tile_47.jpg|count=1}} | {{Tile|image=Hunters_And_Gatherers2_Tile_47.jpg|count=1}} | ||
{{Tile|Hunters_And_Gatherers2_Tile_48.jpg|count=1}} | {{Tile|image=Hunters_And_Gatherers2_Tile_48.jpg|count=1}} | ||
{{Tile|Hunters_And_Gatherers2_Tile_49.jpg|count=1}} | {{Tile|image=Hunters_And_Gatherers2_Tile_49.jpg|count=1}} | ||
{{Tile|Hunters_And_Gatherers2_Tile_50.jpg|count=1}} | {{Tile|image=Hunters_And_Gatherers2_Tile_50.jpg|count=1}} | ||
{{Tile|Hunters_And_Gatherers2_Tile_51.jpg|count=1}} | {{Tile|image=Hunters_And_Gatherers2_Tile_51.jpg|count=1}} | ||
{{Tile|Hunters_And_Gatherers2_Tile_52.jpg|count=1}} | {{Tile|image=Hunters_And_Gatherers2_Tile_52.jpg|count=1}} | ||
{{Tile|Hunters_And_Gatherers2_Tile_53.jpg|count=1}} | {{Tile|image=Hunters_And_Gatherers2_Tile_53.jpg|count=1}} | ||
{{Tile|Hunters_And_Gatherers2_Tile_54.jpg|count=1}} | {{Tile|image=Hunters_And_Gatherers2_Tile_54.jpg|count=1}} | ||
{{Tile|Hunters_And_Gatherers2_Tile_55.jpg|count=1}} | {{Tile|image=Hunters_And_Gatherers2_Tile_55.jpg|count=1}} | ||
{{Tile|Hunters_And_Gatherers2_Tile_56.jpg|count=1}} | {{Tile|image=Hunters_And_Gatherers2_Tile_56.jpg|count=1}} | ||
{{Tile|Hunters_And_Gatherers2_Tile_57.jpg|count=1}} | {{Tile|image=Hunters_And_Gatherers2_Tile_57.jpg|count=1}} | ||
{{Tile|Hunters_And_Gatherers2_Tile_58.jpg|count=1}} | {{Tile|image=Hunters_And_Gatherers2_Tile_58.jpg|count=1}} | ||
{{Tile|Hunters_And_Gatherers2_Tile_59.jpg|count=1}} | {{Tile|image=Hunters_And_Gatherers2_Tile_59.jpg|count=1}} | ||
{{Tile|Hunters_And_Gatherers2_Tile_60.jpg|count=1}} | {{Tile|image=Hunters_And_Gatherers2_Tile_60.jpg|count=1}} | ||
{{Tile|Hunters_And_Gatherers2_Tile_61.jpg|count=1}} | {{Tile|image=Hunters_And_Gatherers2_Tile_61.jpg|count=1}} | ||
{{Tile|Hunters_And_Gatherers2_Tile_62.jpg|count=1}} | {{Tile|image=Hunters_And_Gatherers2_Tile_62.jpg|count=1}} | ||
{{Tile|Hunters_And_Gatherers2_Tile_63.jpg|count=1}} | {{Tile|image=Hunters_And_Gatherers2_Tile_63.jpg|count=1}} | ||
{{Tile|Hunters_And_Gatherers2_Tile_64.jpg|count=1}} | {{Tile|image=Hunters_And_Gatherers2_Tile_64.jpg|count=1}} | ||
{{Tile|Hunters_And_Gatherers2_Tile_65.jpg|count=1}} | {{Tile|image=Hunters_And_Gatherers2_Tile_65.jpg|count=1}} | ||
{{Tile|Hunters_And_Gatherers2_Tile_66.jpg|count=1}} | {{Tile|image=Hunters_And_Gatherers2_Tile_66.jpg|count=1}} | ||
{{Tile|Hunters_And_Gatherers2_Tile_67.jpg|count=1}} | {{Tile|image=Hunters_And_Gatherers2_Tile_67.jpg|count=1}} | ||
{{Tile|Hunters_And_Gatherers2_Tile_68.jpg|count=1}} | {{Tile|image=Hunters_And_Gatherers2_Tile_68.jpg|count=1}} | ||
{{Tile|Hunters_And_Gatherers2_Tile_69.jpg|count=1}} | {{Tile|image=Hunters_And_Gatherers2_Tile_69.jpg|count=1}} | ||
{{Tile|Hunters_And_Gatherers2_Tile_70.jpg|count=1}} | {{Tile|image=Hunters_And_Gatherers2_Tile_70.jpg|count=1}} | ||
{{Tile|Hunters_And_Gatherers2_Tile_71.jpg|count=1}} | {{Tile|image=Hunters_And_Gatherers2_Tile_71.jpg|count=1}} | ||
{{Tile|Hunters_And_Gatherers2_Tile_72.jpg|count=1}} | {{Tile|image=Hunters_And_Gatherers2_Tile_72.jpg|count=1}} | ||
{{Tile|Hunters_And_Gatherers2_Tile_73.jpg|count=1}} | {{Tile|image=Hunters_And_Gatherers2_Tile_73.jpg|count=1}} | ||
{{Tile|Hunters_And_Gatherers2_Tile_74.jpg|count=1}} | {{Tile|image=Hunters_And_Gatherers2_Tile_74.jpg|count=1}} | ||
{{Tile|Hunters_And_Gatherers2_Tile_75.jpg|count=1}} | {{Tile|image=Hunters_And_Gatherers2_Tile_75.jpg|count=1}} | ||
{{Tile|Hunters_And_Gatherers2_Tile_76.jpg|count=1}} | {{Tile|image=Hunters_And_Gatherers2_Tile_76.jpg|count=1}} | ||
{{Tile|Hunters_And_Gatherers2_Tile_77.jpg|count=1}} | {{Tile|image=Hunters_And_Gatherers2_Tile_77.jpg|count=1}} | ||
{{Tile|Hunters_And_Gatherers2_Tile_78.jpg|count=1}} | {{Tile|image=Hunters_And_Gatherers2_Tile_78.jpg|count=1}} | ||
{{Tile|Hunters_And_Gatherers2_Tile_Start.jpg|count=1|countextra=(Start Tile)}} | {{Tile|image=Hunters_And_Gatherers2_Tile_Start.jpg|count=1|countextra=(Start Tile)}} | ||
{{EndTileList}} | {{EndTileList}} | ||
| Line 735: | Line 632: | ||
'''Total Bonus Tiles: 12''' | '''Total Bonus Tiles: 12''' | ||
{{BeginTileList|width=100%}} | {{BeginTileList|width=100%}} | ||
{{Tile|Hunters_And_Gatherers2_Tile_B01.jpg|count=1}} | {{Tile|image=Hunters_And_Gatherers2_Tile_B01.jpg|count=1}} | ||
{{Tile|Hunters_And_Gatherers2_Tile_B02.jpg|count=1}} | {{Tile|image=Hunters_And_Gatherers2_Tile_B02.jpg|count=1}} | ||
{{Tile|Hunters_And_Gatherers2_Tile_B03.jpg|count=1}} | {{Tile|image=Hunters_And_Gatherers2_Tile_B03.jpg|count=1}} | ||
{{Tile|Hunters_And_Gatherers2_Tile_B04.jpg|count=1}} | {{Tile|image=Hunters_And_Gatherers2_Tile_B04.jpg|count=1}} | ||
{{Tile|Hunters_And_Gatherers2_Tile_B05.jpg|count=1}} | {{Tile|image=Hunters_And_Gatherers2_Tile_B05.jpg|count=1}} | ||
{{Tile|Hunters_And_Gatherers2_Tile_B06.jpg|count=1}} | {{Tile|image=Hunters_And_Gatherers2_Tile_B06.jpg|count=1}} | ||
{{Tile|Hunters_And_Gatherers2_Tile_B07.jpg|count=1}} | {{Tile|image=Hunters_And_Gatherers2_Tile_B07.jpg|count=1}} | ||
{{Tile|Hunters_And_Gatherers2_Tile_B08.jpg|count=1}} | {{Tile|image=Hunters_And_Gatherers2_Tile_B08.jpg|count=1}} | ||
{{Tile|Hunters_And_Gatherers2_Tile_B09.jpg|count=1}} | {{Tile|image=Hunters_And_Gatherers2_Tile_B09.jpg|count=1}} | ||
{{Tile|Hunters_And_Gatherers2_Tile_B10.jpg|count=1}} | {{Tile|image=Hunters_And_Gatherers2_Tile_B10.jpg|count=1}} | ||
{{Tile|Hunters_And_Gatherers2_Tile_B11.jpg|count=1}} | {{Tile|image=Hunters_And_Gatherers2_Tile_B11.jpg|count=1}} | ||
{{Tile|Hunters_And_Gatherers2_Tile_B12.jpg|count=1}} | {{Tile|image=Hunters_And_Gatherers2_Tile_B12.jpg|count=1}} | ||
{{Tile|Hunters_And_Gatherers2_Tile_B13.jpg|count=1}} | {{Tile|image=Hunters_And_Gatherers2_Tile_B13.jpg|count=1}} | ||
{{Tile|Hunters_And_Gatherers2_Tile_B14.jpg|count=1}} | {{Tile|image=Hunters_And_Gatherers2_Tile_B14.jpg|count=1}} | ||
{{Tile|Hunters_And_Gatherers2_Tile_B15.jpg|count=1}} | {{Tile|image=Hunters_And_Gatherers2_Tile_B15.jpg|count=1}} | ||
{{Tile|Hunters_And_Gatherers2_Tile_B16.jpg|count=1}} | {{Tile|image=Hunters_And_Gatherers2_Tile_B16.jpg|count=1}} | ||
{{EndTileList}} | {{EndTileList}} | ||
<!--T:131--> | <!--T:131--> | ||
'''Total Points Tiles: 5''' | '''Total Points Tiles: 5''' | ||
{{BeginTileList|700px}} | {{BeginTileList|width=700px}} | ||
{{Tile|Hunters_And_Gatherers2_Score50.jpg|align=center|text=Front}} | {{Tile|image=Hunters_And_Gatherers2_Score50.jpg|align=center|text=Front}} | ||
{{Tile|Hunters_And_Gatherers2_Score100.jpg|align=center|text=Back}} | {{Tile|image=Hunters_And_Gatherers2_Score100.jpg|textbefore= |align=center|text=Back}} | ||
{{EndTileList}} | {{EndTileList}} | ||
Latest revision as of 22:54, 19 February 2024
 |
Thousands of years before the people of Carcassonne built mighty walls and castles, their ancestors settled the land. They hunted wild animals, gathered berries, and caught fish to ensure their daily survival and continued prosperity. Even today, fantastic cave paintings and prehistoric data testify to the vibrant life that existed many generations ago.
General info and comments
The second edition of Hunters and Gatherers was released by Hans im Glück in 2020. It is a clever tile placement game for 2-5 players, ages 8 and up.
What follows is based on the English version ZMG rules from 2020, with any obvious errors corrected, and any variations from the original Hans im Glück version included as footnotes.
Contents
- 79 land tiles (including one starting tile) with forests (including some forests with menhirs (*)), rivers, and lakes with fish, surrounded by grassland with animals.
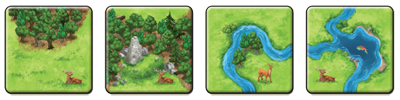 Examples of Land Tiles
(*) A menhir is a massive stone block erected by prehistoric humans,
derived from "men" meaning "stone" and "hir" meaning "long". [1]

 Animals that can be found on the tiles

 Start tile
 Back of Start tile
 Back of Regular tile


- 16 bonus "Menhir" tiles
 Back of Bonus tile

- 1 scoreboard

- 5 points tiles (50 on front, 100 on back)

- 30 tribe members in 5 colours

- 15 huts in 5 colors

- 24 covering markers

Overview
Each turn, you place land tiles to create a vast landscape of forests and grasslands. These grasslands include grazing animals, as well as rivers and lakes full of fish. You must strategically place your tribe members on these tiles to reap the bounty of the forests, grasslands, rivers, and lakes for your tribe. When you do, you will score points both during the game and at the end. After final scoring, the player with the most points wins the game!
Preparation
Place the starting tile (the back with a dark "C") faceup in the middle of the table. Separate the regular land tiles from the menhir tiles by back. Shuffle the menhir tiles and set them aside facedown in a stack. Shuffle the regular tiles and place them facedown in multiple stacks so that each player can easily reach at least 1 stack.
Place the scoreboard near the edge of the table, away from the starting tile.
Finally, each player gets Tribe Members (called "meeple(s)" in the rules). There are 30 meeples, 6 each in yellow, red, green, blue, and violet. There are also 15 huts, 3 in each colour.
Give each player 5 meeples and 3 huts in the colour of their choice.
Place the sixth meeple of each colour in use on the 0 space of the scoreboard. Return any unused meeples and huts to the box.
Playing the game
The youngest player takes the first turn, and play continues clockwise until the land tiles run out.
The current player performs the following actions in order, before continuing to the next player’s turn:
1. Placing a land tile
|
|
Draw 1 land tile and place it so that it continues the landscape. |

2. Placing a Meeple or a Hut
|
|
You may place 1 meeple or 1 hut on the tile you just placed. |
3. Scoring a feature
| You must score any features completed by the tile you placed this turn. |  |
Rivers and Lakes
1. Place a Land Tile
If you draw a tile with a river, you must place it such that it continues the existing landscape (including rivers, grasslands, and forests).

2a. Place a Meeple as a Fisher on a River

You may place a meeple on a river with a hut.

This is legal because there are no other meeples on that river.

They cannot place a meeple on the river on the left side of the lake, because your meeple is already on that river.
2b. Place a Hut on a River or Lake

A river system consists of all rivers connected to each other, including through lakes. While individual rivers end at lakes, rivers are connected to each other through lakes for the purpose of a river system. River systems end only at unconnected tile edges and forests.
You can place a hut on a river where a meeple is already present.Huts can be placed only on rivers or lakes. Huts remain where they are placed until the end of the game.

The left system has one of Blue’s huts on it, so you place your hut on the right river system. Blue’s fisher does not prevent placing this hut.
3. Scoring a river
A river is completed when both ends are closed by lakes or forests, or when it loops back onto itself by connecting to the other end. When a river is completed, it is scored. If one of your meeples is on a river when it scores, you will score points from it, regardless of who placed the tile that completed the river.
You score 1 point for each tile comprising the completed river, and 1 additional point for each fish present in the river and any lakes that close it. . After scoring, return the meeple(s) on the completed feature to their owner’s supply.

You have a meeple on the river, so you score 5 points: 3 points for the 3 tiles forming the river, and 2 for the 2 fish in the lakes.

Players track their scores using the meeples placed on the scoreboard at the start of the game. When you score points, advance your meeple that many spaces on the scoreboard. If your meeple passes the “0” space on the scoreboard, take a scoring marker and place it in front of you with the “50” side face-up. If your meeple passes the “0” space again, flip the marker to the “100” side.

Blue’s meeple stays on the other river, because that river has not scored yet.
These 3 steps are the general rules of the game. Other features have some important differences, explained below.
Forests
1. Place a land tile

A forest edge on a tile can be connected only to another forest edge.
2. Place a Meeple as a Gatherer on a Forest
You may place a meeple on a forest tile you just placed as a gatherer. As with rivers, a meeple can be placed on a forest only if there are no other meeples present on that forest.

3. Score a completed forest
Normal Forest Scoring
A forest is completed when it is surrounded by grassland and has no internal gaps. If your gatherer is the only gatherer on the completed forest, you score 2 points for each tile comprising the completed forest. After scoring, return your meeple to your supply.

Because you completed a forest with a menhir, you begin an extra turn.
Menhirs

If you place a tile that completes a forest containing 1 or more menhirs, you take an extra turn[3], during which you place 1 of the set-aside menhir tiles. After scoring completed features during your current turn, begin an extra turn, drawing and placing a menhir tile from the menhir tile stack. As during a normal turn, you can place a meeple or a hut on the tile you just placed, and score any completed features. If you complete another forest containing 1 or more menhirs during an extra turn, you do not take an additional extra turn. You take only 1 extra turn, even if there are multiple menhirs in a completed forest. If there are no menhir tiles remaining in the menhir tile stack, you cannot take an extra turn.

You place the tile and place a gatherer on the forest.
The forest is now complete, and you score 6 points for the 3 tiles that comprise the forest.The completed forest also contains a menhir, but you cannot begin an extra turn during an extra turn, so your turn ends as normal.
Menhir tiles are often more valuable than normal land tiles. Some menhir tiles have special actions associated with them; see Menhir Tiles.
Grasslands
1. Place a land tile
A grassland edge on a tile can be connected only to another grassland edge.
Grasslands are often divided by forests and rivers.
2. Place a Meeple as a Hunter
You may place a meeple on a grassland tile you just placed as a hunter.
Unlike fishers and gatherers, hunters are placed on grasslands lying down, not standing up.
As with fishers and gatherers, you can place a hunter on a grassland only if there are no other hunters present on that grassland.
Hunters remain on their tiles until the end of the game, and score points based on the number of animals on their grassland.

The river separates this grassland from the other grassland with Blue’s hunter.
These are the core rules you need to know to begin playing. See below for detailed clarifications on specific rules.
Summary
1. Place a land tile
- You must draw and place a tile such that it connects to 1 or more tiles. The tile must continue each feature it is connected to.
- In the rare event that you are unable to place the tile you drew, return that tile to the box and draw a new tile to replace it.
2. Place a Meeple or a Hut
- A meeple or hut can be placed only on the tile you just placed.
- A meeple or hut can be placed only on a feature without another similar piece (meeple or hut).
3. Score completed features
- A river is completed when both ends are closed by lakes or forests, or when it loops back onto itself. A river scores 1 point for each tile, and 1 point for each fish in the river and any lakes that close it.
- A forest is completed when it is surrounded by grassland and has no internal gaps. A forest scores 2 points for each tile.
- Completed features are scored at the end of each turn in which 1 or more features are completed. Points are scored by the player whose meeple occupies a given feature.
- After scoring, all meeples on completed features are returned to their owners’ supplies.
- If you place a tile that completes a forest containing 1 or more menhirs, take an extra turn in which you draw and place a menhir tile. You cannot take multiple extra turns in a row.
- If multiple meeples are present on a single connected feature, the player with the most meeples on the feature scores points. In the event of a tie, all players tied for the most score the full points from the completed feature. For more information on how there can be multiple meeples on the same feature, see the following page.
Multiple meeples on the same feature


End of the Game, Final Scoring, and Determining the Winner
When the last land tile (not menhir tile) is placed, the game ends at the end of that turn. When the game ends, resolve the following steps:
- Leave all huts and hunters on tiles.
- Remove all other meeples from tiles. No points are scored for incomplete forests and rivers.
Final Scoring
Scoring Huts on River Systems
The player with the most huts on each river system scores 1 point for each fish shown in that river system. If multiple players are tied for the most huts, each tied player scores the full points for that river system. River systems do not need to be complete to be scored.
Hut Scoring example

You have 2 huts on the left river system, and Blue has 1. You have the most huts, so you score the 8 points for the 8 fish in that river system.
Yellow and Blue both have 1 hut on the right river system. They each score 10 points for the 10 fish in that river system.
Scoring Hunters and Grasslands
Each hunter scores points based on the animals on its grassland.

The point value for each animal is shown on the scoreboard. A mammoth is worth 3 points, an aurochs 2 points, and a deer 1 point.
Saber-toothed tigers compete with hunters for prey. They hunt only deer, not mammoths or aurochs. For each saber-toothed tiger on a grassland, ignore 1 deer on that grassland.
To assist with scoring grasslands, use the covering markers to cover up pairs of tigers and deer. Then, score points for the remaining mammoths, aurochs, and deer. You do not lose points if there are more tigers than deer on a grassland.
If multiple players are tied for the most hunters on a grassland, each tied player scores the full points from that grassland. However, if one player has the most hunters, only they score from that grassland.
Grassland Scoring example

Grassland 1: 1 aurochs. Green scores 2 points
Grassland 2: 1 deer, 1 mammoth, 1 saber-toothed tiger. Red and Violet each score 3 points for the mammoth. The tiger and deer cancel each other out.
Grassland 3: 1 deer, 2 saber-toothed tigers. Blue does not score points, but does not lose points either.
Grassland 4: 2 mammoths, 2 aurochs, 2 deer, 1 saber-toothed tiger. Red has the most hunters, and scores 11 points (2 mammoths for 6 points, 2 aurochs for 4 points, and 1 deer for 1 point).
The player with the most points wins the game!
In the event of a tie, the tied players share the victory.
Menhir Tiles
Menhirs are found in forests, and when a forest with a menhir is completed, you take an extra turn in which you draw and place a menhir tile.
After placing a menhir tile, you can place a meeple or hut on it as normal.
Menhir tiles with more scoring opportunities
These tiles have more animals on their grasslands and more fish in their lakes and rivers. Otherwise, they function the same as normal land tiles.

Each group of mushrooms is worth 3 points when scoring a forest.

Menhir tiles with immediate actions
When you place a tile with an immediate action, you must immediately resolve the corresponding action.
You can place a meeple or hut on the tile, but are not required to do so to resolve the action.

This tile is not affected by huts present on the river system.
Logboat Scoring example


You score points for the animals shown on the 8 surrounding tiles (orthogonally and diagonally adjacent to this tile) in the same grassland as the hunting trap.
All animals score points as they would during final scoring, including saber-toothed tigers cancelling out deer. Cover all animals scored this way with covering markers. These animals are ignored during final scoring.Hunting Trap example

First, cover the tiger and 1 deer (1). You score 4 points (3 for the mammoth and 1 for the remaining deer).
The mammoth on the far right does not score, because it is on a separate grassland.
Cover all scored animals (2).
It does not matter which tile this meeple is returned from.
Menhir tiles that affect final scoring
These tiles modify the value of the river system or grassland they are connected to.

Each animal (mammoth, aurochs, deer) on the 8 surrounding tiles (orthogonally and diagonally adjacent to this tile) in this grassland scores double points.
Tiger still cancel our deer as normal, although the scoring player can choose to cover deer further away from the trap.Pit Trap example

First, the tiger eats the deer, then you score 20 points (12 for the 2 mammoths and 8 for the 2 aurochs).
The deer on the right does not score with this grassland, because it is on a separate grassland.

Credits
Game Design: Klaus-Jürgen Wrede, Bernd Brunnhofer
Art: Marcel Gröber
Layout: Christof Tisch
English Rules Translation: Adam Marostica
Tile Distribution
Total Regular Tiles: 79
 ×1
×1 ×1
×1 ×1
×1 ×1
×1 ×1
×1 ×1
×1 ×1
×1 ×1
×1 ×1
×1 ×1
×1 ×1
×1 ×1
×1 ×1
×1 ×1
×1 ×1
×1 ×1
×1 ×1
×1 ×1
×1 ×1
×1 ×1
×1 ×1
×1 ×1
×1 ×1
×1 ×1
×1 ×1
×1 ×1
×1 ×1
×1 ×1
×1 ×1
×1 ×1
×1 ×1
×1 ×1
×1 ×1
×1 ×1
×1 ×1
×1 ×1
×1 ×1
×1 ×1
×1 ×1
×1 ×1
×1 ×1
×1 ×1
×1 ×1
×1 ×1
×1 ×1
×1 ×1
×1 ×1
×1 ×1
×1 ×1
×1 ×1
×1 ×1
×1 ×1
×1 ×1
×1 ×1
×1 ×1
×1 ×1
×1 ×1
×1 ×1
×1 ×1
×1 ×1
×1 ×1
×1 ×1
×1 ×1
×1 ×1
×1 ×1
×1 ×1
×1 ×1
×1 ×1
×1 ×1
×1 ×1
×1 ×1
×1 ×1
×1 ×1
×1 ×1
×1 ×1
×1 ×1
×1 ×1
×1 ×1
×1 ×1 (Start Tile)
Total Bonus Tiles: 12
 ×1
×1 ×1
×1 ×1
×1 ×1
×1 ×1
×1 ×1
×1 ×1
×1 ×1
×1 ×1
×1 ×1
×1 ×1
×1 ×1
×1 ×1
×1 ×1
×1 ×1
×1 ×1
×1Total Points Tiles: 5


Footnotes
For Icons explanation and licensing please visit Icons page.
- ↑
 The Hans im Glück rules, when translated, simply state "A menhir is a towering prehistoric stone block ..." but does not mention the origin of the name, which is from the Breton language.
- ↑ The ZMG version of the rules said "8" tiles - HiG version, and Dutch 999 Games version, correctly state "4".
- ↑
 You don't have to have a follower in the forest to gain the extra turn, just be the one to close it.
- ↑
The Z-Man Games rules said "8 points" and "3" lakes - the Hans im Glück version correctly stated "4" lakes.
- ↑
Or you could score 7 points by placing your fisher on the river occupied by Blue's Hut! There's an extra fish on the river, hidden by the hut. Both HiG and ZMG versions don't consider this.
- ↑ An early version of the ZMG rules stated that you "must" remove 1 of your meeples from play, rather than "may".