Difference between revisions of "The Discovery Base Game"
m (→Grasslands) |
|||
| (33 intermediate revisions by 5 users not shown) | |||
| Line 1: | Line 1: | ||
<languages /><translate> | {{UX | ||
|title=<translate><!--T:92--> The Discovery Base Game</translate> | |||
|sortingtitle=<translate><!--T:93--> The Discovery Base Game</translate> | |||
|seotitle=<translate><!--T:94--> Carcassonne - {{TranslatedPageName}}</translate> | |||
|image={{filepath:<translate><!--T:95--> Box_Discovery_RGG.png</translate>|nowiki}} | |||
|description=<translate><!--T:96--> The people of the Carcassonne region have decided to expand to distant lands. The players explore and discover the geography of the surrounding area, facing the dangers of the sea and the mountains, and exploring the vast grasslands. The skill and strategy of the players exploring these new territories and their approach to controlling them by deploying their followers as brigands, navigators, and explorers will determine who is victorious.</translate> | |||
}}<languages /><translate> | |||
<!--T:1--> | |||
{{ChooseDesign | |||
|image=Discovery_Tile_05.jpg | |||
|image2=Discovery_Tile_44.jpg | |||
|showcarcassonne=true | |||
}} | |||
{{Breadcrumbs|link1={{TheDiscoveryLink}}}} | |||
< | <!--T:2--> | ||
<div class="toclimit-4"> | |||
{| style="float:right; text-align:center;" | |||
|- | |||
| [[File:Box_Discovery_RGG.png|right|200px]] | |||
|} | |||
__TOC__ | |||
</div> | |||
<!--T:5--> | |||
{{DottedFrameMessage|text=''The people of the Carcassonne region have decided to expand to distant lands. The players explore and discover the geography of the surrounding area, facing the dangers of the sea and the mountains, and exploring the vast grasslands. The skill and strategy of the players exploring these new territories and their approach to controlling them by deploying their followers as brigands, navigators, and explorers will determine who is victorious.'' | |||
}} | |||
== General info and comments == | == General info and comments == <!--T:3--> | ||
<!--T:4--> | |||
'''The Discovery''' was released by [[Hans im Glück|Hans im Glück]] in {{Year|2005}}. It is a tile-laying game for 2 to 5 players, ages 10 and above. It was designed by Leo Colovini, based on the Carcassonne system by Klaus Jurgen Wrede. | '''The Discovery''' was released by [[Hans im Glück|Hans im Glück]] in {{Year|2005}}. It is a tile-laying game for 2 to 5 players, ages 10 and above. It was designed by Leo Colovini, based on the Carcassonne system by Klaus Jurgen Wrede. | ||
== Contents == <!--T:6--> | |||
== Contents == | |||
<!--T:7--> | |||
* '''84 landscape tiles''' (including one starting tile) which include mountain, grassland and sea segments. On the shores of some mountain and grassland segments, there are port cities. | * '''84 landscape tiles''' (including one starting tile) which include mountain, grassland and sea segments. On the shores of some mountain and grassland segments, there are port cities. | ||
:[[File:Discovery_TileFeatures.jpg|frame|none]] | :[[File:Discovery_TileFeatures.jpg|frame|none|'''A.''' Grassland <br />'''B.''' Mountain <br />'''C.''' Port Cities <br />'''D.''' Sea]] | ||
:{| | :{| | ||
|- valign="top" | |- valign="top" | ||
| Line 23: | Line 44: | ||
|} | |} | ||
<!--T:8--> | |||
* '''1 scoring track''' | * '''1 scoring track''' | ||
:[[File:Discovery_Scoretrack.jpg|none]] | :[[File:Discovery_Scoretrack.jpg|none]] | ||
<!--T:9--> | |||
* '''5 summary cards''' | * '''5 summary cards''' | ||
:[[File:Discovery_SummaryCard.jpg|none]] | :[[File:Discovery_SummaryCard.jpg|none]] | ||
<!--T:10--> | |||
* '''25 followers in 5 colors'''. Each follower can be used as a brigand (in the mountains), navigator (on the seas) or as an explorer (in the grasslands). One of each player's followers is used as the player's scoring marker. | * '''25 followers in 5 colors'''. Each follower can be used as a brigand (in the mountains), navigator (on the seas) or as an explorer (in the grasslands). One of each player's followers is used as the player's scoring marker. | ||
:[[File:Discovery_Followers.jpg|none|150px]] | :[[File:Discovery_Followers.jpg|none|150px]] | ||
== Overview == | == Overview == <!--T:11--> | ||
<!--T:12--> | |||
The players place the land tiles turn by turn. As they do so, the mountains, grasslands and seas emerge and grow. On these, the players can deploy their followers to score points both during the game and at the end. The player with the most points after the finals scoring is the winner. | The players place the land tiles turn by turn. As they do so, the mountains, grasslands and seas emerge and grow. On these, the players can deploy their followers to score points both during the game and at the end. The player with the most points after the finals scoring is the winner. | ||
== Preparation == | == Preparation == <!--T:13--> | ||
<!--T:14--> | |||
Place the starting tile face up in the middle of the table. Shuffle the remaining landscape tiles face down and stack them in several face-down stacks so that all players have easy access to them. Place the scoring track near one edge of the table to leave room for the players to place land tiles in the middle of the table. | Place the starting tile face up in the middle of the table. Shuffle the remaining landscape tiles face down and stack them in several face-down stacks so that all players have easy access to them. Place the scoring track near one edge of the table to leave room for the players to place land tiles in the middle of the table. | ||
<!--T:15--> | |||
Each player takes a summary card and the 5 followers of one colour, and places one as a scoring marker on space '''0''' of the scoring track. Each player places the remaining four followers in front of themselves on the table, as the player's supply. The players choose a starting player using any method they want. | Each player takes a summary card and the 5 followers of one colour, and places one as a scoring marker on space '''0''' of the scoring track. Each player places the remaining four followers in front of themselves on the table, as the player's supply. The players choose a starting player using any method they want. | ||
== Playing the game == | == Playing the game == <!--T:16--> | ||
<!--T:17--> | |||
Players take turns, in clockwise order, beginning with the starting player. On a player's turn, the player carries out the following actions in the order shown :- | Players take turns, in clockwise order, beginning with the starting player. On a player's turn, the player carries out the following actions in the order shown :- | ||
<!--T:18--> | |||
* 1. The player must draw and place a new landscape tile | * 1. The player must draw and place a new landscape tile | ||
* 2. The player may either | * 2. The player may either | ||
| Line 51: | Line 80: | ||
** score a territory by removing one previously deployed follower | ** score a territory by removing one previously deployed follower | ||
<!--T:19--> | |||
'''Note:'''a player may never both deploy and remove a follower on the same turn. | '''Note:'''a player may never both deploy and remove a follower on the same turn. | ||
<!--T:20--> | |||
When a player neither deploys, nor withdraws, a follower, the player may simply place the landscape tile and end their turn. | When a player neither deploys, nor withdraws, a follower, the player may simply place the landscape tile and end their turn. | ||
=== 1. Place landscape tiles === | === 1. Place landscape tiles === <!--T:21--> | ||
<!--T:22--> | |||
First, a player '''must''' draw a landscape tile from one of the face-down stacks. The player may look at it, then show it to the other players (so they can advise on the "best" placement of the tile), and places it on the table using the following rules :- | First, a player '''must''' draw a landscape tile from one of the face-down stacks. The player may look at it, then show it to the other players (so they can advise on the "best" placement of the tile), and places it on the table using the following rules :- | ||
<!--T:23--> | |||
* The new tile (with red borders in the examples) must be placed with at least one edge abutting one previously placed tile. The new tile may not simply be placed corner to corner with a previous tile. | * The new tile (with red borders in the examples) must be placed with at least one edge abutting one previously placed tile. The new tile may not simply be placed corner to corner with a previous tile. | ||
* The new tile must be placed so that all segments on the new tile continue any mountain, grassland, and sea segments on all abutting tiles. | * The new tile must be placed so that all segments on the new tile continue any mountain, grassland, and sea segments on all abutting tiles. | ||
{| | <!--T:24--> | ||
{{BeginTileList|width=100%}} | |||
| [[File:Discovery_Ex01.jpg|frame|none|The grassland continues]] | {{Block|[[File:Discovery_Ex01.jpg|frame|none|The grassland continues]]<br /> | ||
[[File:Discovery_Ex02.jpg|frame|none|The mountain continues]]}} | |||
{{Block|[[File:Discovery_Ex03.jpg|frame|none|On one side, the sea continues; on the other side the mountain continues]]}} | |||
{{Block|[[File:Discovery_Ex04.jpg|frame|none|This is not a legal placement]]}} | |||
{{EndTileList}} | |||
<!--T:25--> | |||
In the rare circumstance where a drawn tile has no legal placement (and all players agree), the player discards the tile from game (into the box) and draws another tile. | In the rare circumstance where a drawn tile has no legal placement (and all players agree), the player discards the tile from game (into the box) and draws another tile. | ||
=== 2. Deploying followers === | === 2. Deploying followers === <!--T:26--> | ||
<!--T:27--> | |||
After the player places a land tile, the player may deploy one of their followers, using the the following rules :- | After the player places a land tile, the player may deploy one of their followers, using the the following rules :- | ||
<!--T:28--> | |||
* The player may only place 1 follower on a turn | * The player may only place 1 follower on a turn | ||
* The player must take it from their supply | * The player must take it from their supply | ||
| Line 81: | Line 117: | ||
* The player must choose where to deploy the follower on the tile, as follows | * The player must choose where to deploy the follower on the tile, as follows | ||
[[File: | <!--T:29--> | ||
{| | |||
|- style="vertical-align:middle;" | |||
| style="text-align:center;" | '''Explorer''' | |||
| | |||
| style="text-align:center;" | '''Brigand''' | |||
| | |||
| style="text-align:center;" | '''Navigator''' | |||
|- | |||
| [[File:Discovery_Ex05_Explorer.jpg|frameless|none]] | |||
| style="text-align:center;"| ''or'' | |||
| [[File:Discovery_Ex05_Brigand.jpg|frameless|none]] | |||
| style="text-align:center;"| ''or'' | |||
| [[File:Discovery_Ex05_Navigator.jpg|frameless|none]] | |||
|- | |||
| style="text-align:center;" | in the grasslands | |||
| | |||
| style="text-align:center;" | in the mountains | |||
| | |||
| style="text-align:center;" | on the sea | |||
|} | |||
<!--T:30--> | |||
* The player may not deploy a follower on a mountain, grassland or sea segment if that segment connects to a segment on another tile that already has a follower (from any player) on it (no matter how far away). See the following examples. | * The player may not deploy a follower on a mountain, grassland or sea segment if that segment connects to a segment on another tile that already has a follower (from any player) on it (no matter how far away). See the following examples. | ||
{| | <!--T:31--> | ||
{{BeginTileList|width=100%}} | |||
| [[File:Discovery_Ex06.jpg|frame|none|{{ColorRed|Red}} can only deploy a navigator, as there is already a brigand on a connected mountain segment]] | {{Block|[[File:Discovery_Ex06.jpg|frame|none|{{ColorRed|Red}} can only deploy a navigator, as there is already a brigand on a connected mountain segment.]]}} | ||
<!--T:32--> | |||
{{Block|[[File:Discovery_Ex07.jpg|frame|none|{{ColorRed|Red}} can deploy a follower as a brigand or an explorer, but not as a navigator, as there is already a navigator on a connected sea segment.]]}} | |||
{{EndTileList}} | |||
=== 3. Scoring a Territory === | === 3. Scoring a Territory === <!--T:33--> | ||
<!--T:34--> | |||
'''Instead''' of deploying a follower, a player can remove an already deployed follower and score points for the territory where it was. The player moves their scoring marker forward on the scoring track a number of spaces equal to the points earned and place the removed follower back into their supply. The player may deploy the follower on their next turn, if they choose. | '''Instead''' of deploying a follower, a player can remove an already deployed follower and score points for the territory where it was. The player moves their scoring marker forward on the scoring track a number of spaces equal to the points earned and place the removed follower back into their supply. The player may deploy the follower on their next turn, if they choose. | ||
<!--T:35--> | |||
A player may remove a follower and score any territory where the player has one or more followers, whether the territory is completed or not, and whether the follower removed shares the territory with other player's followers or not. | A player may remove a follower and score any territory where the player has one or more followers, whether the territory is completed or not, and whether the follower removed shares the territory with other player's followers or not. | ||
<!--T:36--> | |||
The values of the territories are as follows. | The values of the territories are as follows. | ||
==== Grasslands ==== | ==== Grasslands ==== <!--T:37--> | ||
<!--T:38--> | |||
If the '''grassland is incomplete''', it is worth '''1 point for each segment''' of the grassland (count the number of tiles). Note that an incomplete grassland can grow and be completed later. | If the '''grassland is incomplete''', it is worth '''1 point for each segment''' of the grassland (count the number of tiles). Note that an incomplete grassland can grow and be completed later. | ||
<!--T:39--> | |||
If the '''grassland is complete''' (that is, completely surrounded by mountains or seas), it is worth '''2 points for each segment''' of the grassland (count the number of tiles). Note that a completed grassland cannot grow either in size or value. In both cases, the presence of cities does not affect the value of the grassland. | If the '''grassland is complete''' (that is, completely surrounded by mountains or seas), it is worth '''2 points for each segment''' of the grassland (count the number of tiles). Note that a completed grassland cannot grow either in size or value. In both cases, the presence of cities does not affect the value of the grassland. | ||
{{ColorBlue| | <!--T:40--> | ||
{{ColorBlue|Exception:}} when a '''completed grassland has just 2 tiles''', it is worth only '''2 points''' (instead of 4). | |||
<!--T:84--> | |||
{{BeginTileList|width=100%}} | |||
<!--T:41--> | |||
{{Block|[[File:Discovery_Ex08.jpg|frame|none|'''An incomplete grassland:''' it has 4 tiles and {{ColorRed|Red}}, removing the follower, scores 4 points.]]}} | |||
<!--T:42--> | |||
{{Block|[[File:Discovery_Ex09.jpg|frame|none|'''A completed grassland with only 2 tiles:''' {{ColorRed|Red}}, removing the follower, scores only 2 points.]]}} | |||
<!--T:43--> | |||
{{Block|[[File:Discovery_Ex10.jpg|frame|none|'''A completed grassland:''' it has 5 tiles and {{ColorRed|Red}}, removing the follower, scores 5x2=10 points.]]}} | |||
<!--T:85--> | |||
{{EndTileList}} | |||
==== Mountains ==== | ==== Mountains ==== <!--T:44--> | ||
<!--T:45--> | |||
If the '''mountain is incomplete''', it is worth '''1 point for each city''' located in that mountain and in all adjacent grasslands. Note that an incomplete mountain can grow and be completed later. | If the '''mountain is incomplete''', it is worth '''1 point for each city''' located in that mountain and in all adjacent grasslands. Note that an incomplete mountain can grow and be completed later. | ||
<!--T:46--> | |||
If the '''mountain is complete''' (that is, completely surrounded by grasslands or seas), it is worth '''2 points for each city''' located in that mountain and in all adjacent grasslands. Note that a completed mountain cannot grow in size, but its value can increase, as new cities are added to adjacent grasslands. | If the '''mountain is complete''' (that is, completely surrounded by grasslands or seas), it is worth '''2 points for each city''' located in that mountain and in all adjacent grasslands. Note that a completed mountain cannot grow in size, but its value can increase, as new cities are added to adjacent grasslands. | ||
{{ColorBlue| | <!--T:47--> | ||
{{ColorBlue|Exception:}} when a '''completed mountain has just 2 tiles''', it is worth only '''1 point''' (instead of 2) '''per city'''. | |||
<!--T:86--> | |||
{{BeginTileList|width=100%}} | |||
<!--T:48--> | |||
{{Block|[[File:Discovery_Ex11.jpg|frame|none|'''An incomplete mountain:''' there are 4 cities (1 in the same territory and 3 in adjacent grasslands) and {{ColorRed|Red}}, removing the follower, scores 4 points.]]}} | |||
<!--T:49--> | |||
{{Block|[[File:Discovery_Ex12.jpg|frame|none|'''A complete mountain:''' in the example there are 5 cities, but just 4 (1 in the mountain and 3 in adjacent grasslands) score points; the 5th isn't in an adjacent grassland. {{ColorRed|Red}}, removing the follower, scores 4x2=8 points.]]}} | |||
<!--T:50--> | |||
{{Block|[[File:Discovery_Ex13.jpg|frame|none|'''A complete mountain with only 2 tiles:''' {{ColorRed|Red}}, removing the follower, scores only 4 points, 1 per city (it does not matter whether the adjacent grassland is complete or not, nor how far from the mountain a city in the grassland is - a city may be several segments away as long as a connected path can be traced across the grassland to the mountain).]]}} | |||
<!--T:87--> | |||
{{EndTileList}} | |||
==== Seas ==== | ==== Seas ==== <!--T:51--> | ||
<!--T:52--> | |||
If the '''sea is incomplete''', it is worth '''1 point for each city''' located on its shores. Note that an incomplete sea can grow and be completed later. | If the '''sea is incomplete''', it is worth '''1 point for each city''' located on its shores. Note that an incomplete sea can grow and be completed later. | ||
<!--T:53--> | |||
If the '''sea is complete''' (that is, completely surrounded by grasslands or mountains), it is worth '''1 point for each city''' located on its shores, plus '''1 point for each segment of the sea''' (count the tiles). Note that a completed sea cannot grow either in size or in value. | If the '''sea is complete''' (that is, completely surrounded by grasslands or mountains), it is worth '''1 point for each city''' located on its shores, plus '''1 point for each segment of the sea''' (count the tiles). Note that a completed sea cannot grow either in size or in value. | ||
{{ColorBlue| | <!--T:54--> | ||
{{ColorBlue|Exception:}} when a '''completed sea has just 2 tiles''', it is worth only '''1 point for each city''' located on its shores. | |||
<!--T:88--> | |||
{{BeginTileList|width=100%}} | |||
<!--T:55--> | |||
{{Block|[[File:Discovery_Ex14.jpg|frame|none|'''An incomplete sea:''' on its shores, there are 2 cities and {{ColorRed|Red}}, removing the follower, scores 2 points.]]}} | |||
[[File: | <!--T:56--> | ||
{{Block|[[File:Discovery_Ex15.jpg|frame|none|'''A complete sea:''' there are 3 cities on its shores and it has 4 tiles, and {{ColorRed|Red}}, removing the follower, scores 3+4=7 points.]]}} | |||
[[File: | <!--T:57--> | ||
{{Block|[[File:Discovery_Ex16.jpg|frame|none|'''A complete sea with only 2 tiles:''' {{ColorRed|Red}}, removing a follower, scores only 1 point, as there is 1 city on its shores.]]}} | |||
<!--T:89--> | |||
{{EndTileList}} | |||
==== A Territory with more than one Follower ==== | ==== A Territory with more than one Follower ==== <!--T:58--> | ||
<!--T:59--> | |||
It is possible, through clever placement of landscape tiles, for there to be more than one explorer on a grassland, more than one brigand on a mountain segment, or more than one navigator on an area of sea. | It is possible, through clever placement of landscape tiles, for there to be more than one explorer on a grassland, more than one brigand on a mountain segment, or more than one navigator on an area of sea. | ||
<!--T:60--> | |||
When this occurs, each follower is considered separately, as though it were alone. There are no majorities and minorities. Each single follower can score the points for the territory. | When this occurs, each follower is considered separately, as though it were alone. There are no majorities and minorities. Each single follower can score the points for the territory. | ||
<!--T:61--> | |||
For example, if a player has several followers in a territory, they may be removed on different turns, scoring the value of the territory when it is removed ('''Note:''' The player '''may not''' remove them all in the same turn). | For example, if a player has several followers in a territory, they may be removed on different turns, scoring the value of the territory when it is removed ('''Note:''' The player '''may not''' remove them all in the same turn). | ||
[[File:Discovery_Ex17.jpg|frame|none|{{ColorRed|Red}} adds the tile with red borders and deploys a follower on the sea; this can be done because that sea, so far, is not connected to the sea with the {{ColorYellow|Yellow}} follower)]] | <!--T:62--> | ||
{{BeginTileList|width=100%}} | |||
{{Block|[[File:Discovery_Ex17.jpg|frame|none|{{ColorRed|Red}} adds the tile with red borders and deploys a follower on the sea; this can be done because that sea, so far, is not connected to the sea with the {{ColorYellow|Yellow}} follower).]]}} | |||
[[File:Discovery_Ex18.jpg|frame|none|Later, a new tile is added to connect the 2 seas. Now, both {{ColorRed|Red}} and {{ColorYellow|Yellow}} have a navigator in the same sea and can score for this new, larger sea (so far only 4 points for the cities, as the sea is still incomplete, but the value may become much larger)]] | <!--T:63--> | ||
{{Block|[[File:Discovery_Ex18.jpg|frame|none|Later, a new tile is added to connect the 2 seas. Now, both {{ColorRed|Red}} and {{ColorYellow|Yellow}} have a navigator in the same sea and can score for this new, larger sea (so far only 4 points for the cities, as the sea is still incomplete, but the value may become much larger.)]]}} | |||
{{EndTileList}} | |||
==== After removing from an incomplete Territory ==== | ==== After removing from an incomplete Territory ==== <!--T:64--> | ||
When a player removes a follower from an incomplete territory, this territory (if it has no other followers) becomes empty and it is possible for a player, by placing a new tile that enlarges the territory, to deploy a follower on it<ref> | <!--T:65--> | ||
{{IconArrow}}This could be the same player who removed a follower from the same territory on a previous turn.</ref> | When a player removes a follower from an incomplete territory, this territory (if it has no other followers) becomes empty and it is possible for a player, by placing a new tile that enlarges the territory, to deploy a follower on it. <ref> | ||
{{IconArrow}} | |||
This could be the same player who removed a follower from the same territory on a previous turn. | |||
</ref> | |||
== Game End == | == Game End == <!--T:66--> | ||
<!--T:67--> | |||
At the end of the player's turn when the last landscape tile is placed, the game ends. Then, final scoring follows. | At the end of the player's turn when the last landscape tile is placed, the game ends. Then, final scoring follows. | ||
== Final Scoring == | == Final Scoring == <!--T:68--> | ||
Each player scores points for any of their followers that have not yet been removed from the playing area | <!--T:69--> | ||
Each player scores points for any of their followers that have not yet been removed from the playing area. | |||
<!--T:90--> | |||
'''Note:''' To calculate the points for each, all the territories involved in the final scoring are considered incomplete, even if they are actually complete. | |||
<!--T:70--> | |||
The player with the most points is the winner! | The player with the most points is the winner! | ||
== Variants == | == Variants == <!--T:71--> | ||
=== Double tile === | === Double tile === <!--T:72--> | ||
<!--T:73--> | |||
At the beginning of the game, each player takes 2 tiles, randomly, which are kept, face down, in front of them. | At the beginning of the game, each player takes 2 tiles, randomly, which are kept, face down, in front of them. | ||
<!--T:74--> | |||
On their turn, each player chooses one of the 2 tiles, places it, then draws another tile, to have 2 tiles available for the next turn. | On their turn, each player chooses one of the 2 tiles, places it, then draws another tile, to have 2 tiles available for the next turn. | ||
=== Equal number of turns === | === Equal number of turns === <!--T:75--> | ||
<!--T:76--> | |||
To ensure that all players have the same numbers of turns during the game, players may choose to remove some tiles from the game, depending on the number of players. Tiles should be removed randomly at the beginning of the game and placed, face up, next to the scoring track. | To ensure that all players have the same numbers of turns during the game, players may choose to remove some tiles from the game, depending on the number of players. Tiles should be removed randomly at the beginning of the game and placed, face up, next to the scoring track. | ||
<!--T:77--> | |||
* if 2 or 5 players, remove 1 tile | * if 2 or 5 players, remove 1 tile | ||
* if 3 players, remove 2 tiles | * if 3 players, remove 2 tiles | ||
* if 4 players, remove 3 tiles | * if 4 players, remove 3 tiles | ||
== Tile Distribution == | == Tile Distribution == <!--T:78--> | ||
''' | <!--T:91--> | ||
'''Note:''' tile artwork may differ where more than 1 tile is available for a particular configuration; start tile outlined in {{ColorRed|red}}. | |||
<!--T:80--> | |||
{{BeginTileList| | {{BeginTileList|width=100%|tiles=84}} | ||
{{Tile|Discovery_Tile_01.jpg| | {{Tile|image=Discovery_Tile_01.jpg|count=1}} | ||
{{Tile|Discovery_Tile_02.jpg| | {{Tile|image=Discovery_Tile_02.jpg|count=2}} | ||
{{Tile|Discovery_Tile_03.jpg| | {{Tile|image=Discovery_Tile_03.jpg|count=2}} | ||
{{Tile|Discovery_Tile_04.jpg| | {{Tile|image=Discovery_Tile_04.jpg|count=1}} | ||
{{Tile|Discovery_Tile_05.jpg| | {{Tile|image=Discovery_Tile_05.jpg|count=1}} | ||
{{Tile|Discovery_Tile_06.jpg| | {{Tile|image=Discovery_Tile_06.jpg|count=1}} | ||
{{Tile|Discovery_Tile_07.jpg| | {{Tile|image=Discovery_Tile_07.jpg|count=1}} | ||
{{Tile|Discovery_Tile_08.jpg| | {{Tile|image=Discovery_Tile_08.jpg|count=1}} | ||
{{Tile|Discovery_Tile_09.jpg| | {{Tile|image=Discovery_Tile_09.jpg|count=2}} | ||
{{Tile|Discovery_Tile_10.jpg| | {{Tile|image=Discovery_Tile_10.jpg|count=1}} | ||
{{Tile|Discovery_Tile_11.jpg| | {{Tile|image=Discovery_Tile_11.jpg|count=1}} | ||
{{Tile|Discovery_Tile_12.jpg| | {{Tile|image=Discovery_Tile_12.jpg|count=1}} | ||
{{Tile|Discovery_Tile_13.jpg| | {{Tile|image=Discovery_Tile_13.jpg|count=2}} | ||
{{Tile|Discovery_Tile_14.jpg| | {{Tile|image=Discovery_Tile_14.jpg|count=2}} | ||
{{Tile|Discovery_Tile_15.jpg| | {{Tile|image=Discovery_Tile_15.jpg|count=3}} | ||
{{Tile|Discovery_Tile_16.jpg| | {{Tile|image=Discovery_Tile_16.jpg|count=1}} | ||
{{Tile|Discovery_Tile_17.jpg| | {{Tile|image=Discovery_Tile_17.jpg|count=1}} | ||
{{Tile|Discovery_Tile_18.jpg| | {{Tile|image=Discovery_Tile_18.jpg|count=1}} | ||
{{Tile|Discovery_Tile_19.jpg| | {{Tile|image=Discovery_Tile_19.jpg|count=3}} | ||
{{Tile|Discovery_Tile_20.jpg| | {{Tile|image=Discovery_Tile_20.jpg|count=2}} | ||
{{Tile|Discovery_Tile_21.jpg| | {{Tile|image=Discovery_Tile_21.jpg|count=2}} | ||
{{Tile|Discovery_Tile_22.jpg| | {{Tile|image=Discovery_Tile_22.jpg|count=1}} | ||
{{Tile|Discovery_Tile_23.jpg| | {{Tile|image=Discovery_Tile_23.jpg|count=1}} | ||
{{Tile|image=Discovery_Tile_25.jpg|count=1}} | |||
{{Tile|Discovery_Tile_25.jpg| | {{Tile|image=Discovery_Tile_26.jpg|count=1}} | ||
{{Tile|Discovery_Tile_26.jpg| | {{Tile|image=Discovery_Tile_27.jpg|count=1}} | ||
{{Tile|Discovery_Tile_27.jpg| | {{Tile|image=Discovery_Tile_28.jpg|count=1}} | ||
{{Tile|Discovery_Tile_28.jpg| | {{Tile|image=Discovery_Tile_29.jpg|count=1}} | ||
{{Tile|Discovery_Tile_29.jpg| | {{Tile|image=Discovery_Tile_30.jpg|count=1}} | ||
{{Tile|Discovery_Tile_30.jpg| | {{Tile|image=Discovery_Tile_31.jpg|count=1}} | ||
{{Tile|Discovery_Tile_31.jpg| | {{Tile|image=Discovery_Tile_32.jpg|count=1}} | ||
{{Tile|Discovery_Tile_32.jpg| | {{Tile|image=Discovery_Tile_33.jpg|count=1}} | ||
{{Tile|Discovery_Tile_33.jpg| | {{Tile|image=Discovery_Tile_34.jpg|count=1}} | ||
{{Tile|Discovery_Tile_34.jpg| | {{Tile|image=Discovery_Tile_35.jpg|count=1}} | ||
{{Tile|Discovery_Tile_35.jpg| | {{Tile|image=Discovery_Tile_36.jpg|count=2}} | ||
{{Tile|Discovery_Tile_36.jpg| | {{Tile|image=Discovery_Tile_37.jpg|count=1}} | ||
{{Tile|Discovery_Tile_37.jpg| | {{Tile|image=Discovery_Tile_38.jpg|count=1}} | ||
{{Tile|Discovery_Tile_38.jpg| | {{Tile|image=Discovery_Tile_39.jpg|count=1}} | ||
{{Tile|Discovery_Tile_39.jpg| | {{Tile|image=Discovery_Tile_40.jpg|count=1}} | ||
{{Tile|Discovery_Tile_40.jpg| | {{Tile|image=Discovery_Tile_41.jpg|count=2}} | ||
{{Tile|Discovery_Tile_41.jpg| | {{Tile|image=Discovery_Tile_42.jpg|count=2}} | ||
{{Tile|Discovery_Tile_42.jpg| | {{Tile|image=Discovery_Tile_43.jpg|count=1}} | ||
{{Tile|Discovery_Tile_43.jpg| | {{Tile|image=Discovery_Tile_44.jpg|count=1}} | ||
{{Tile|Discovery_Tile_44.jpg| | {{Tile|image=Discovery_Tile_45.jpg|count=1}} | ||
{{Tile|Discovery_Tile_45.jpg| | {{Tile|image=Discovery_Tile_46.jpg|count=1}} | ||
{{Tile|Discovery_Tile_46.jpg| | {{Tile|image=Discovery_Tile_47.jpg|count=1}} | ||
{{Tile|Discovery_Tile_47.jpg| | {{Tile|image=Discovery_Tile_48.jpg|count=1}} | ||
{{Tile|Discovery_Tile_48.jpg| | {{Tile|image=Discovery_Tile_49.jpg|count=1}} | ||
{{Tile|Discovery_Tile_49.jpg| | {{Tile|image=Discovery_Tile_50.jpg|count=1}} | ||
{{Tile|Discovery_Tile_50.jpg| | {{Tile|image=Discovery_Tile_51.jpg|count=1}} | ||
{{Tile|Discovery_Tile_51.jpg| | {{Tile|image=Discovery_Tile_52.jpg|count=1}} | ||
{{Tile|Discovery_Tile_52.jpg| | {{Tile|image=Discovery_Tile_53.jpg|count=1}} | ||
{{Tile|Discovery_Tile_53.jpg| | {{Tile|image=Discovery_Tile_54.jpg|count=1}} | ||
{{Tile|Discovery_Tile_54.jpg| | {{Tile|image=Discovery_Tile_55.jpg|count=1}} | ||
{{Tile|Discovery_Tile_55.jpg| | {{Tile|image=Discovery_Tile_56.jpg|count=1}} | ||
{{Tile|Discovery_Tile_56.jpg| | {{Tile|image=Discovery_Tile_57.jpg|count=2}} | ||
{{Tile|Discovery_Tile_57.jpg| | {{Tile|image=Discovery_Tile_58.jpg|count=1}} | ||
{{Tile|Discovery_Tile_58.jpg| | {{Tile|image=Discovery_Tile_59.jpg|count=2}} | ||
{{Tile|Discovery_Tile_59.jpg| | {{Tile|image=Discovery_Tile_60.jpg|count=2}} | ||
{{Tile|Discovery_Tile_60.jpg| | {{Tile|image=Discovery_Tile_61.jpg|count=1}} | ||
{{Tile|Discovery_Tile_61.jpg| | {{Tile|image=Discovery_Tile_62.jpg|count=1}} | ||
{{Tile|Discovery_Tile_62.jpg| | {{Tile|image=Discovery_Tile_63.jpg|count=1}} | ||
{{Tile|Discovery_Tile_63.jpg| | {{Tile|image=Discovery_Tile_64.jpg|count=1}} | ||
{{Tile|Discovery_Tile_64.jpg| | {{Tile|image=Discovery_Tile_65.jpg|count=1}} | ||
{{Tile|Discovery_Tile_65.jpg| | {{Tile|image=Discovery_Tile_66.jpg|count=1}} | ||
{{Tile|Discovery_Tile_66.jpg| | {{Tile|image=Discovery_Tile_Start.jpg|count=1|config=Start Tile}} | ||
{{EndTileList}} | {{EndTileList}} | ||
< | <!--T:82--> | ||
{{FootnoteIconPara}} | |||
{{ | |||
<!--T:83--> | |||
[[Category:Completed]] | [[Category:Completed]] | ||
[[Category:Discovery]] | |||
[[Category:Spinoff]] | [[Category:Spinoff]] | ||
</translate> | </translate> | ||
Latest revision as of 12:45, 7 March 2024
 |
You are reading the rules for this tile design. |  |
| If your tiles look like this, you have regular Carcassonne tiles. |  |
| If your tiles have a different design, then choose a game from Spin-offs. |  |
 |
The people of the Carcassonne region have decided to expand to distant lands. The players explore and discover the geography of the surrounding area, facing the dangers of the sea and the mountains, and exploring the vast grasslands. The skill and strategy of the players exploring these new territories and their approach to controlling them by deploying their followers as brigands, navigators, and explorers will determine who is victorious.
General info and comments
The Discovery was released by Hans im Glück in 2005. It is a tile-laying game for 2 to 5 players, ages 10 and above. It was designed by Leo Colovini, based on the Carcassonne system by Klaus Jurgen Wrede.
Contents
- 84 landscape tiles (including one starting tile) which include mountain, grassland and sea segments. On the shores of some mountain and grassland segments, there are port cities.
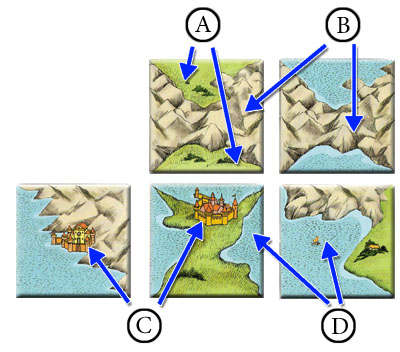 A. Grassland
B. Mountain
C. Port Cities
D. Sea

 Starting tile
 Start tile back
 Regular tile back


- 1 scoring track

- 5 summary cards

- 25 followers in 5 colors. Each follower can be used as a brigand (in the mountains), navigator (on the seas) or as an explorer (in the grasslands). One of each player's followers is used as the player's scoring marker.

Overview
The players place the land tiles turn by turn. As they do so, the mountains, grasslands and seas emerge and grow. On these, the players can deploy their followers to score points both during the game and at the end. The player with the most points after the finals scoring is the winner.
Preparation
Place the starting tile face up in the middle of the table. Shuffle the remaining landscape tiles face down and stack them in several face-down stacks so that all players have easy access to them. Place the scoring track near one edge of the table to leave room for the players to place land tiles in the middle of the table.
Each player takes a summary card and the 5 followers of one colour, and places one as a scoring marker on space 0 of the scoring track. Each player places the remaining four followers in front of themselves on the table, as the player's supply. The players choose a starting player using any method they want.
Playing the game
Players take turns, in clockwise order, beginning with the starting player. On a player's turn, the player carries out the following actions in the order shown :-
- 1. The player must draw and place a new landscape tile
- 2. The player may either
- deploy one follower from the player's supply on the landscape tile just placed, or
- score a territory by removing one previously deployed follower
Note:a player may never both deploy and remove a follower on the same turn.
When a player neither deploys, nor withdraws, a follower, the player may simply place the landscape tile and end their turn.
1. Place landscape tiles
First, a player must draw a landscape tile from one of the face-down stacks. The player may look at it, then show it to the other players (so they can advise on the "best" placement of the tile), and places it on the table using the following rules :-
- The new tile (with red borders in the examples) must be placed with at least one edge abutting one previously placed tile. The new tile may not simply be placed corner to corner with a previous tile.
- The new tile must be placed so that all segments on the new tile continue any mountain, grassland, and sea segments on all abutting tiles.


In the rare circumstance where a drawn tile has no legal placement (and all players agree), the player discards the tile from game (into the box) and draws another tile.
2. Deploying followers
After the player places a land tile, the player may deploy one of their followers, using the the following rules :-
- The player may only place 1 follower on a turn
- The player must take it from their supply
- The players may only deploy it to the tile just placed
- The player must choose where to deploy the follower on the tile, as follows
| Explorer | Brigand | Navigator | ||
 |
or |  |
or |  |
| in the grasslands | in the mountains | on the sea |
- The player may not deploy a follower on a mountain, grassland or sea segment if that segment connects to a segment on another tile that already has a follower (from any player) on it (no matter how far away). See the following examples.


3. Scoring a Territory
Instead of deploying a follower, a player can remove an already deployed follower and score points for the territory where it was. The player moves their scoring marker forward on the scoring track a number of spaces equal to the points earned and place the removed follower back into their supply. The player may deploy the follower on their next turn, if they choose.
A player may remove a follower and score any territory where the player has one or more followers, whether the territory is completed or not, and whether the follower removed shares the territory with other player's followers or not.
The values of the territories are as follows.
Grasslands
If the grassland is incomplete, it is worth 1 point for each segment of the grassland (count the number of tiles). Note that an incomplete grassland can grow and be completed later.
If the grassland is complete (that is, completely surrounded by mountains or seas), it is worth 2 points for each segment of the grassland (count the number of tiles). Note that a completed grassland cannot grow either in size or value. In both cases, the presence of cities does not affect the value of the grassland.
Exception: when a completed grassland has just 2 tiles, it is worth only 2 points (instead of 4).


Mountains
If the mountain is incomplete, it is worth 1 point for each city located in that mountain and in all adjacent grasslands. Note that an incomplete mountain can grow and be completed later.
If the mountain is complete (that is, completely surrounded by grasslands or seas), it is worth 2 points for each city located in that mountain and in all adjacent grasslands. Note that a completed mountain cannot grow in size, but its value can increase, as new cities are added to adjacent grasslands.
Exception: when a completed mountain has just 2 tiles, it is worth only 1 point (instead of 2) per city.


Seas
If the sea is incomplete, it is worth 1 point for each city located on its shores. Note that an incomplete sea can grow and be completed later.
If the sea is complete (that is, completely surrounded by grasslands or mountains), it is worth 1 point for each city located on its shores, plus 1 point for each segment of the sea (count the tiles). Note that a completed sea cannot grow either in size or in value.
Exception: when a completed sea has just 2 tiles, it is worth only 1 point for each city located on its shores.


A Territory with more than one Follower
It is possible, through clever placement of landscape tiles, for there to be more than one explorer on a grassland, more than one brigand on a mountain segment, or more than one navigator on an area of sea.
When this occurs, each follower is considered separately, as though it were alone. There are no majorities and minorities. Each single follower can score the points for the territory.
For example, if a player has several followers in a territory, they may be removed on different turns, scoring the value of the territory when it is removed (Note: The player may not remove them all in the same turn).


After removing from an incomplete Territory
When a player removes a follower from an incomplete territory, this territory (if it has no other followers) becomes empty and it is possible for a player, by placing a new tile that enlarges the territory, to deploy a follower on it. [1]
Game End
At the end of the player's turn when the last landscape tile is placed, the game ends. Then, final scoring follows.
Final Scoring
Each player scores points for any of their followers that have not yet been removed from the playing area.
Note: To calculate the points for each, all the territories involved in the final scoring are considered incomplete, even if they are actually complete.
The player with the most points is the winner!
Variants
Double tile
At the beginning of the game, each player takes 2 tiles, randomly, which are kept, face down, in front of them.
On their turn, each player chooses one of the 2 tiles, places it, then draws another tile, to have 2 tiles available for the next turn.
Equal number of turns
To ensure that all players have the same numbers of turns during the game, players may choose to remove some tiles from the game, depending on the number of players. Tiles should be removed randomly at the beginning of the game and placed, face up, next to the scoring track.
- if 2 or 5 players, remove 1 tile
- if 3 players, remove 2 tiles
- if 4 players, remove 3 tiles
Tile Distribution
Note: tile artwork may differ where more than 1 tile is available for a particular configuration; start tile outlined in red.
 ×1
×1 ×2
×2 ×2
×2 ×1
×1 ×1
×1 ×1
×1 ×1
×1 ×1
×1 ×2
×2 ×1
×1 ×1
×1 ×1
×1 ×2
×2 ×2
×2 ×3
×3 ×1
×1 ×1
×1 ×1
×1 ×3
×3 ×2
×2 ×2
×2 ×1
×1 ×1
×1 ×1
×1 ×1
×1 ×1
×1 ×1
×1 ×1
×1 ×1
×1 ×1
×1 ×1
×1 ×1
×1 ×1
×1 ×1
×1 ×2
×2 ×1
×1 ×1
×1 ×1
×1 ×1
×1 ×2
×2 ×2
×2 ×1
×1 ×1
×1 ×1
×1 ×1
×1 ×1
×1 ×1
×1 ×1
×1 ×1
×1 ×1
×1 ×1
×1 ×1
×1 ×1
×1 ×1
×1 ×1
×1 ×2
×2 ×1
×1 ×2
×2 ×2
×2 ×1
×1 ×1
×1 ×1
×1 ×1
×1 ×1
×1 ×1
×1 ×1
×1Footnotes
For Icons explanation and licensing please visit Icons page.
- ↑
 This could be the same player who removed a follower from the same territory on a previous turn.