Difference between revisions of "New World Base Game/fr"
Black Bear (talk | contribs) (Created page with "Mayflower (jeu de base)") |
Tags: Mobile edit Mobile web edit |
||
| (41 intermediate revisions by 3 users not shown) | |||
| Line 1: | Line 1: | ||
<languages/> | <languages/> | ||
{{ | {{Breadcrumbs|link1={{NewWorldLink}}}} | ||
[[File: | [[File:Box_NewWorld_HiG_FR.png|frameless|200px|right]] | ||
== | == Informations générales et commentaires == | ||
Initialement publié par [[Hans im Glück/fr|Hans im Glück]] en {{Year|2008}} sous le nom de '''Mayflower''' ; Lorsqu’il a été publié par [[Rio Grande Games/fr|Rio Grande Games]], en anglais, le nom a été changé en '''New World'''. | |||
Le jeu reprend de nombreux concepts du jeu de Carcassonne, mais les transpose de la France médiévale au début de la colonisation de la côte est de l’Amérique du Nord. | |||
Les joueurs développent le Nouveau Monde à partir d’une représentation de la côte est entre Jamestown au sud, s’étendant jusqu’à Plymouth au nord. En laissant la côte derrière eux, en explorant toujours plus à l’ouest, les joueurs déploient leurs colons sur les pistes, dans les villes, dans les fermes et dans les plaines. Les compétences des joueurs pour développer la région et utiliser leurs brigands, commerçants, trappeurs et fermiers détermineront le vainqueur. | |||
Au tour par tour, les joueurs placent des tuiles Terrain. Au fur et à mesure qu’ils le font, des sentiers, des villes, des plaines et des fermes apparaissent et se développent. À leur tour, les joueurs peuvent déployer leurs colons sur ces zones pour gagner des points. Les joueurs marquent des points pendant et à la fin de la partie. Le joueur qui a le plus de points après l’évaluation finale est le gagnant. | |||
Le jeu introduit le concept d''''arpenteurs''' qui mènent une progression vers l’ouest. Nos colons risquent de perdre la possibilité de marquer des points s’ils ne parviennent pas à se déplacer sur les traces des arpenteurs. | |||
== | == Matériel == | ||
* '''95 | * '''95 tuiles Terrain''' | ||
* '''30 | * '''30 colons''' en 5 couleurs différentes (6 de chaque, mais un est utilisé comme pion de score) | ||
:[[File:Figure_Settlers.png|x50px]] | :[[File:Figure_Settlers.png|x50px]] | ||
* ''' 2 | * ''' 2 arpenteurs''' en blanc | ||
:[[File:Figure_Surveyor.png|x55px]] | :[[File:Figure_Surveyor.png|x55px]] | ||
* ''' | * '''Plateau de jeu''' combinant un plateau de score et des cases de départ | ||
:[[File:NewWorld_Start.png]] | :[[File:NewWorld_Start.png]] | ||
== | == Mise en place == | ||
Placez le plateau de jeu sur un côté de la table de sorte que les cases de départ soient orientées vers le milieu de la table. Mélangez les tuiles Terrain et empilez-les en plusieurs piles, face cachée, afin que tous les joueurs puissent y accéder facilement <ref>{{IconHouse}} Vous pouvez aussi utiliser un petit sac, si vous en avez un à disposition.</ref>. | |||
Chaque joueur prend les 6 colons de sa couleur et en pose un comme pion de score dans la grande case « 0 » de la piste de score. Chaque joueur pose ses 5 autres colons devant lui sur la table (l’aire de jeu) comme réserve personnelle. | |||
Posez les deux arpenteurs sur les cases de départ situées aux extrémités opposées du plateau de jeu <ref> | |||
{{IconArrow}} | |||
Cette phrase est différente dans les règles anglaises, où les deux arpenteurs n’ont pas d’emplacement de départ prédéfini : | |||
« Posez les deux arpenteurs sur deux des cases de départ du plateau de jeu – peu importe lesquelles. » | |||
</ref>. | |||
Le plus jeune joueur décide qui commence le jeu <ref> | |||
{{IconArrow}} | |||
Cette phrase est différente dans les règles anglaises, où les joueurs collaborent pour décider quel sera le joueur qui commencera : | |||
« Les joueurs décident entre eux qui sera le premier joueur, en utilisant la méthode de leur choix. » | |||
</ref>. | |||
== | == Déroulement d’une partie == | ||
Les joueurs jouent à tour de rôle dans le sens des aiguilles d’une montre, en commençant par le premier joueur. À son tour, le joueur exécute '''dans l’ordre''' les actions suivantes : | |||
* | * Le joueur '''doit''' piocher et placer une nouvelle tuile Terrain. | ||
* | * Le joueur '''peut''' poser un des colons de sa réserve '''sur la tuile Terrain''' qui vient d’être placée. | ||
* | * Si, en plaçant la tuile Terrain, les fermes, les sentiers et/ou les villes sont complétés, ils sont alors évalués. | ||
* | * Le tour du joueur est terminé et le joueur suivant, dans le sens des aiguilles d’une montre, commence son tour de la même manière. | ||
Ces actions sont décrites, de manière plus détaillée, dans les sections ci-dessous. | |||
[[File:NewWorld_features1.png]] [[File:NewWorld_features2.png]] | {{BeginBlockList|width=1000px}} | ||
{{Block| | |||
[[File:NewWorld_features1.png|frame|none|Ferme et section de ville]] | |||
}} | |||
{{Block| | |||
[[File:NewWorld_features2.png|frame|none|Intersections, sections de piste et sections de plaine]] | |||
}} | |||
{{EndBlockList}} | |||
=== | === Placement d’une tuile === | ||
First a player '''must''' draw a land tile from one of the face-down stacks. After looking at it, it should be shown to the other players (so they can advise on the "best" placement of the tile), and then placed on the table, using the following rules: | First a player '''must''' draw a land tile from one of the face-down stacks. After looking at it, it should be shown to the other players (so they can advise on the "best" placement of the tile), and then placed on the table, using the following rules: | ||
| Line 55: | Line 70: | ||
* The new tile '''must''' be placed so that all plains, town, and trail segments on the new tile continue plains, town, and trail segments on all touching tiles. | * The new tile '''must''' be placed so that all plains, town, and trail segments on the new tile continue plains, town, and trail segments on all touching tiles. | ||
{{BeginBlockList | {{BeginBlockList}} | ||
{{Block| | {{Block| | ||
[[File:NewWorld_place1.png|frame|none|Trail and plains segments are continued]] | [[File:NewWorld_place1.png|frame|none|Trail and plains segments are continued]] | ||
| Line 64: | Line 79: | ||
{{EndBlockList}} | {{EndBlockList}} | ||
{{BeginBlockList | {{BeginBlockList}} | ||
{{Block| | {{Block| | ||
[[File:NewWorld_place3.png|frame|none|On one edge the town segment is continued and on the other edge the plains segment is continued]] | [[File:NewWorld_place3.png|frame|none|On one edge the town segment is continued and on the other edge the plains segment is continued]] | ||
| Line 75: | Line 90: | ||
In the rare circumstance where a drawn tile has no legal placement (and all players agree), the player discards the tile from the game (into the box) and draws another tile to place. | In the rare circumstance where a drawn tile has no legal placement (and all players agree), the player discards the tile from the game (into the box) and draws another tile to place. | ||
=== | === Pose d’un colon === | ||
After the player places a land tile, he/she '''may''' deploy one of their settlers, using the following rules: | After the player places a land tile, he/she '''may''' deploy one of their settlers, using the following rules: | ||
| Line 84: | Line 99: | ||
* The player '''must''' choose where to deploy the settler on the tile, either as a: | * The player '''must''' choose where to deploy the settler on the tile, either as a: | ||
{{BeginBlockList|1400px}} | {{BeginBlockList|width=1400px}} | ||
{{Block| | {{Block| | ||
[[File:NewWorld_settler1.png|frame|none|'''Shopkeeper''' <ref>{{IconArrow}} In the original [[Hans im Glück|Hans im Glück]] rules for Mayflower, this settler was the "Sheriff".</ref> in a town segment]] | [[File:NewWorld_settler1.png|frame|none|'''Shopkeeper''' <ref>{{IconArrow}} In the original [[Hans im Glück|Hans im Glück]] rules for Mayflower, this settler was the "Sheriff".</ref> in a town segment]] | ||
| Line 101: | Line 116: | ||
* The player '''may not''' deploy a settler on a plains, town, or trail segment if that segment connects to a segment of the same feature on another tile (no matter how far away) that already has a settler (from any player, including the active player) on it. See the following examples. | * The player '''may not''' deploy a settler on a plains, town, or trail segment if that segment connects to a segment of the same feature on another tile (no matter how far away) that already has a settler (from any player, including the active player) on it. See the following examples. | ||
{{BeginBlockList|1400px}} | {{BeginBlockList|width=1400px}} | ||
{{Block| | {{Block| | ||
[[File:NewWorld_invplace1.png|frame|none|{{ColorBlue|BLUE}} can only deploy a trapper as there is already a shopkeeper in a connected town segment.]] | [[File:NewWorld_invplace1.png|frame|none|{{ColorBlue|BLUE}} can only deploy a trapper as there is already a shopkeeper in a connected town segment.]] | ||
| Line 117: | Line 132: | ||
'''Remember:''' if, through the placement of the tile, towns, trails, and/or farms are completed, these are scored before moving on to the next player. | '''Remember:''' if, through the placement of the tile, towns, trails, and/or farms are completed, these are scored before moving on to the next player. | ||
=== | === Évaluation d’une zone === | ||
==== | ==== Une piste complétée ==== | ||
[[File:NewWorld_tradingPost.png|thumb|right|Trading Post]] | [[File:NewWorld_tradingPost.png|thumb|right|Trading Post]] | ||
| Line 136: | Line 151: | ||
</table> | </table> | ||
==== | ==== Une ville complétée ==== | ||
[[File:NewWorld_flag.png|thumb|right|Town Flag]] | [[File:NewWorld_flag.png|thumb|right|Town Flag]] | ||
| Line 157: | Line 172: | ||
'''When two or more players tie with the most robbers or shopkeepers, they each earn the total points for the trail or town.''' | '''When two or more players tie with the most robbers or shopkeepers, they each earn the total points for the trail or town.''' | ||
==== | ==== Une ferme complétée ==== | ||
[[File:NewWorld_farmhouse.png|thumb|right|Farmhouse]] | [[File:NewWorld_farmhouse.png|thumb|right|Farmhouse]] | ||
| Line 165: | Line 180: | ||
[[File:NewWorld_farm1.png|frame|none|{{ColorRed|RED}} earns 9 points.]] | [[File:NewWorld_farm1.png|frame|none|{{ColorRed|RED}} earns 9 points.]] | ||
=== | === Après l’évaluation === | ||
After a trail, a town, or a farm is scored (and '''only''' then), the settlers involved are returned to the appropriate players' supplies. The returned settlers may be used by the players as any of the possible settlers (robber, farmer, shopkeeper, or farmer) in '''later''' turns. | After a trail, a town, or a farm is scored (and '''only''' then), the settlers involved are returned to the appropriate players' supplies. The returned settlers may be used by the players as any of the possible settlers (robber, farmer, shopkeeper, or farmer) in '''later''' turns. | ||
| Line 186: | Line 201: | ||
</blockquote> | </blockquote> | ||
=== | === Arpenteurs : leurs avantages et les limites qu’ils imposent === | ||
After each feature is scored (there may be more than one in a turn), the player whose turn it is moves '''one''' surveyor one column to the west (away from the coast). It doesn't matter which tile the player places the surveyor on as long as it is in the correct column. The player '''must''' move the eastern-most surveyor if the surveyors are not in the same column. Thus, the two surveyors will never be more than one column apart in their westward trek. If the surveyors are both in the western-most column of tiles (no tiles to their west) neither moves. They will remain there until a feature is scored and there are tile(s) to their west. If a feature is completed, but not scored, the player does '''not''' move a surveyor. If there is only one tile in the westernmost column, both surveyors may share that space. | After each feature is scored (there may be more than one in a turn), the player whose turn it is moves '''one''' surveyor one column to the west (away from the coast). It doesn't matter which tile the player places the surveyor on as long as it is in the correct column. The player '''must''' move the eastern-most surveyor if the surveyors are not in the same column. Thus, the two surveyors will never be more than one column apart in their westward trek. If the surveyors are both in the western-most column of tiles (no tiles to their west) neither moves. They will remain there until a feature is scored and there are tile(s) to their west. If a feature is completed, but not scored, the player does '''not''' move a surveyor. If there is only one tile in the westernmost column, both surveyors may share that space. | ||
==== | ==== Bonus d’évaluation ==== | ||
When a settler is scored that is standing on the same column with one (or two) surveyor(s), the player scoring the settler gets '''+4 points''' for each surveyor! (note: a surveyor is moved '''after''' the settler is scored!) | When a settler is scored that is standing on the same column with one (or two) surveyor(s), the player scoring the settler gets '''+4 points''' for each surveyor! (note: a surveyor is moved '''after''' the settler is scored!) | ||
==== | ==== Enlever les colons à la traîne ==== | ||
When a surveyor is moved west remove any standing settlers ('''not''' trappers - they remain lying down until the end of the game) from any columns to the "east" of the eastern-most surveyor and return them to their owners without scoring. <ref> The [[Rio Grande Games|'''RGG''']] rules stated "Whenever the ''eastern-most'' surveyor is moved west ..." but this has been clarified as unclear on BGG although it could be argued that if both surveyors are in the same column they could both be considered "easternmost", and if in different columns, then the easternmost one must be moved. Therefore it implies it is each time!</ref> A player may place a settler on a just-placed tile in columns "east" of the surveyors, but it is dangerous as such a settler (not a trapper) will be removed immediately after the next scoring! <ref>There is nothing to stop a player placing a tile to complete a feature east of the surveyors, placing a settler on it and immediately scoring, as the surveyor moves '''after''' the scoring has taken place and the settler returned to the player's supply.</ref> | When a surveyor is moved west remove any standing settlers ('''not''' trappers - they remain lying down until the end of the game) from any columns to the "east" of the eastern-most surveyor and return them to their owners without scoring. <ref> The [[Rio Grande Games|'''RGG''']] rules stated "Whenever the ''eastern-most'' surveyor is moved west ..." but this has been clarified as unclear on BGG although it could be argued that if both surveyors are in the same column they could both be considered "easternmost", and if in different columns, then the easternmost one must be moved. Therefore it implies it is each time!</ref> A player may place a settler on a just-placed tile in columns "east" of the surveyors, but it is dangerous as such a settler (not a trapper) will be removed immediately after the next scoring! <ref>There is nothing to stop a player placing a tile to complete a feature east of the surveyors, placing a settler on it and immediately scoring, as the surveyor moves '''after''' the scoring has taken place and the settler returned to the player's supply.</ref> | ||
| Line 209: | Line 224: | ||
</table> | </table> | ||
=== | === Les Plaines === | ||
Connected plains segments are called plains. Plains are not scored if completed during the game. Players may deploy trappers on plains segments, but they only score at the end of the game. '''A trapper remains in the plains segment where it is deployed for the entire game and is never returned to the player's supply!''' To emphasize this, place the trapper on its side on the plains segment. Plains are bordered by trails, towns, and the edge of the area where the land tiles are played. | Connected plains segments are called plains. Plains are not scored if completed during the game. Players may deploy trappers on plains segments, but they only score at the end of the game. '''A trapper remains in the plains segment where it is deployed for the entire game and is never returned to the player's supply!''' To emphasize this, place the trapper on its side on the plains segment. Plains are bordered by trails, towns, and the edge of the area where the land tiles are played. | ||
=== | === Fin de partie === | ||
At the end of the player's turn during which the last land tile is placed, the game ends. If the player completes one or more features, these are scored as normal and then the game proceeds to the final scoring. | At the end of the player's turn during which the last land tile is placed, the game ends. If the player completes one or more features, these are scored as normal and then the game proceeds to the final scoring. | ||
==== | ==== Évaluation finale : Sentiers, Villes et Fermes incomplets ==== | ||
For each incomplete trail and town, the player, who has a robber on the trail or shopkeeper in the town, earns '''one point''' for each trail or town segment (instead of 2 points). Flags (in towns) are worth '''1 point''' each (instead of 2 points), but Trading Posts (on trails) are still worth '''2 points'''. <ref>Although not specified in the main [[Rio Grande Games|'''RGG''']] rule, Trading Posts are listed in the Scoring Summary at the foot of the last page.</ref> | For each incomplete trail and town, the player, who has a robber on the trail or shopkeeper in the town, earns '''one point''' for each trail or town segment (instead of 2 points). Flags (in towns) are worth '''1 point''' each (instead of 2 points), but Trading Posts (on trails) are still worth '''2 points'''. <ref>Although not specified in the main [[Rio Grande Games|'''RGG''']] rule, Trading Posts are listed in the Scoring Summary at the foot of the last page.</ref> | ||
| Line 231: | Line 246: | ||
'''BLACK''' earns nothing, as {{ColorGreen|GREEN}} has more shopkeepers in the town than '''BLACK'''.]] | '''BLACK''' earns nothing, as {{ColorGreen|GREEN}} has more shopkeepers in the town than '''BLACK'''.]] | ||
==== | ==== Évaluation finale : Trappeurs (pour les animaux des plaines) ==== | ||
[[File:NewWorld_animals2.png|thumb|right|The three animal symbols]] | [[File:NewWorld_animals2.png|thumb|right|The three animal symbols]] | ||
| Line 253: | Line 268: | ||
'''The player with the most points is the winner. If players tie with the most, they rejoice in their shared victory.''' | '''The player with the most points is the winner. If players tie with the most, they rejoice in their shared victory.''' | ||
== | == Ensemble des tuiles == | ||
''' | '''Total des tuiles : 95''' | ||
{{BeginTileList|900px}} | {{BeginTileList|width=900px}} | ||
{{Tile|NewW_tile-01.png| | {{Tile|image=NewW_tile-01.png|count=2}} | ||
{{Tile|NewW_tile-02.png| | {{Tile|image=NewW_tile-02.png|count=3}} | ||
{{Tile|NewW_tile-03.png| | {{Tile|image=NewW_tile-03.png|count=3}} | ||
{{Tile|NewW_tile-04.png| | {{Tile|image=NewW_tile-04.png|count=2}} | ||
{{Tile|NewW_tile-05.png| | {{Tile|image=NewW_tile-05.png|count=1}} | ||
{{Tile|NewW_tile-06.png| | {{Tile|image=NewW_tile-06.png|count=1}} | ||
{{Tile|NewW_tile-07.png| | {{Tile|image=NewW_tile-07.png|count=1}} | ||
{{Tile|NewW_tile-08.png| | {{Tile|image=NewW_tile-08.png|count=3}} | ||
{{Tile|NewW_tile-09.png| | {{Tile|image=NewW_tile-09.png|count=2}} | ||
{{Tile|NewW_tile-10.png| | {{Tile|image=NewW_tile-10.png|count=1}} | ||
{{Tile|NewW_tile-11.png| | {{Tile|image=NewW_tile-11.png|count=4}} | ||
{{Tile|NewW_tile-12.png| | {{Tile|image=NewW_tile-12.png|count=3}} | ||
{{Tile|NewW_tile-13.png| | {{Tile|image=NewW_tile-13.png|count=1}} | ||
{{Tile|NewW_tile-14.png| | {{Tile|image=NewW_tile-14.png|count=3}} | ||
{{Tile|NewW_tile-15.png| | {{Tile|image=NewW_tile-15.png|count=2}} | ||
{{Tile|NewW_tile-16.png| | {{Tile|image=NewW_tile-16.png|count=3}} | ||
{{Tile|NewW_tile-17.png| | {{Tile|image=NewW_tile-17.png|count=4}} | ||
{{Tile|NewW_tile-18.png| | {{Tile|image=NewW_tile-18.png|count=4}} | ||
{{Tile|NewW_tile-19.png| | {{Tile|image=NewW_tile-19.png|count=1}} | ||
{{Tile|NewW_tile-20.png| | {{Tile|image=NewW_tile-20.png|count=1}} | ||
{{Tile|NewW_tile-21.png| | {{Tile|image=NewW_tile-21.png|count=3}} | ||
{{Tile|NewW_tile-22.png| | {{Tile|image=NewW_tile-22.png|count=1}} | ||
{{Tile|NewW_tile-23.png| | {{Tile|image=NewW_tile-23.png|count=1}} | ||
{{Tile|NewW_tile-24.png| | {{Tile|image=NewW_tile-24.png|count=1}} | ||
{{Tile|NewW_tile-25.png| | {{Tile|image=NewW_tile-25.png|count=1}} | ||
{{Tile|NewW_tile-26.png| | {{Tile|image=NewW_tile-26.png|count=3}} | ||
{{Tile|NewW_tile-27.png| | {{Tile|image=NewW_tile-27.png|count=2}} | ||
{{Tile|NewW_tile-28.png| | {{Tile|image=NewW_tile-28.png|count=1}} | ||
{{Tile|NewW_tile-29.png| | {{Tile|image=NewW_tile-29.png|count=2}} | ||
{{Tile|NewW_tile-30.png| | {{Tile|image=NewW_tile-30.png|count=2}} | ||
{{Tile|NewW_tile-31.png| | {{Tile|image=NewW_tile-31.png|count=1}} | ||
{{Tile|NewW_tile-32.png| | {{Tile|image=NewW_tile-32.png|count=1}} | ||
{{Tile|NewW_tile-33.png| | {{Tile|image=NewW_tile-33.png|count=2}} | ||
{{Tile|NewW_tile-34.png| | {{Tile|image=NewW_tile-34.png|count=3}} | ||
{{Tile|NewW_tile-35.png| | {{Tile|image=NewW_tile-35.png|count=1}} | ||
{{Tile|NewW_tile-36.png| | {{Tile|image=NewW_tile-36.png|count=3}} | ||
{{Tile|NewW_tile-37.png| | {{Tile|image=NewW_tile-37.png|count=3}} | ||
{{Tile|NewW_tile-38.png| | {{Tile|image=NewW_tile-38.png|count=1}} | ||
{{Tile|NewW_tile-39.png| | {{Tile|image=NewW_tile-39.png|count=3}} | ||
{{Tile|NewW_tile-40.png| | {{Tile|image=NewW_tile-40.png|count=2}} | ||
{{Tile|NewW_tile-41.png| | {{Tile|image=NewW_tile-41.png|count=1}} | ||
{{Tile|NewW_tile-42.png| | {{Tile|image=NewW_tile-42.png|count=1}} | ||
{{Tile|NewW_tile-43.png| | {{Tile|image=NewW_tile-43.png|count=1}} | ||
{{Tile|NewW_tile-44.png| | {{Tile|image=NewW_tile-44.png|count=1}} | ||
{{Tile|NewW_tile-45.png| | {{Tile|image=NewW_tile-45.png|count=1}} | ||
{{Tile|NewW_tile-46.png| | {{Tile|image=NewW_tile-46.png|count=3}} | ||
{{Tile|NewW_tile-47.png| | {{Tile|image=NewW_tile-47.png|count=1}} | ||
{{Tile|NewW_tile-48.png| | {{Tile|image=NewW_tile-48.png|count=2}} | ||
{{Tile|NewW_tile-49.png| | {{Tile|image=NewW_tile-49.png|count=1}} | ||
{{Tile|NewW_tile-50.png| | {{Tile|image=NewW_tile-50.png|count=1}} | ||
{{EndTileList}} | {{EndTileList}} | ||
''' | '''Verso des tuiles :''' | ||
{{BeginTileList|700px}} | {{BeginTileList|width=700px}} | ||
{{Tile|NewW_tileback.png| }} | {{Tile|image=NewW_tileback.png|config= }} | ||
{{EndTileList}} | {{EndTileList}} | ||
== | == Règles non officielles == | ||
Place one surveyor on the start board, and the other on the 0 space of the scoring track. When the first trail, town or farm is completed, move the surveyor from the 0 space to the 1 space on the scoring track. Repeat from 1 to 2, 2 to 3, until he reaches space number 5, at which point he is placed on the game board, in any of the starting spaces (as described under preparation, above. Thereafter, the surveyors move, as described, when features are scored. (from BGG) | Place one surveyor on the start board, and the other on the 0 space of the scoring track. When the first trail, town or farm is completed, move the surveyor from the 0 space to the 1 space on the scoring track. Repeat from 1 to 2, 2 to 3, until he reaches space number 5, at which point he is placed on the game board, in any of the starting spaces (as described under preparation, above. Thereafter, the surveyors move, as described, when features are scored. (from BGG) | ||
== | == Crédits == | ||
Cette page est principalement basée sur les règles du jeu '''New World''' publié par [[Rio Grande Games/fr|Rio Grande Games]] avec des révisions mineures des règles et des images adaptées des règles originales du jeu '''Mayflower''' de [[Hans im Glück/fr|Hans im Glück]] où il y a eu quelques variations entre les sources. Des commentaires et des clarifications supplémentaires sont venus de divers forums de discussion sur Carcassonne (BGG, CarcC et CarcF). | |||
{{FootnoteIconPara}} | {{FootnoteIconPara}} | ||
[[Category: | [[Category:Under Construction/fr|Mayflower (jeu de base)]] | ||
[[Category: | [[Category:Mayflower| Jeu de base]] | ||
[[Category: | [[Category:Jeu dérivé|Mayflower (jeu de base)]] | ||
[[Category:Around The World]] | [[Category:Around The World|Mayflower (jeu de base)]] | ||
Latest revision as of 12:54, 9 March 2024

Informations générales et commentaires
Initialement publié par Hans im Glück en 2008 sous le nom de Mayflower ; Lorsqu’il a été publié par Rio Grande Games, en anglais, le nom a été changé en New World.
Le jeu reprend de nombreux concepts du jeu de Carcassonne, mais les transpose de la France médiévale au début de la colonisation de la côte est de l’Amérique du Nord.
Les joueurs développent le Nouveau Monde à partir d’une représentation de la côte est entre Jamestown au sud, s’étendant jusqu’à Plymouth au nord. En laissant la côte derrière eux, en explorant toujours plus à l’ouest, les joueurs déploient leurs colons sur les pistes, dans les villes, dans les fermes et dans les plaines. Les compétences des joueurs pour développer la région et utiliser leurs brigands, commerçants, trappeurs et fermiers détermineront le vainqueur.
Au tour par tour, les joueurs placent des tuiles Terrain. Au fur et à mesure qu’ils le font, des sentiers, des villes, des plaines et des fermes apparaissent et se développent. À leur tour, les joueurs peuvent déployer leurs colons sur ces zones pour gagner des points. Les joueurs marquent des points pendant et à la fin de la partie. Le joueur qui a le plus de points après l’évaluation finale est le gagnant.
Le jeu introduit le concept d'arpenteurs qui mènent une progression vers l’ouest. Nos colons risquent de perdre la possibilité de marquer des points s’ils ne parviennent pas à se déplacer sur les traces des arpenteurs.
Matériel
- 95 tuiles Terrain
- 30 colons en 5 couleurs différentes (6 de chaque, mais un est utilisé comme pion de score)

- 2 arpenteurs en blanc
- Plateau de jeu combinant un plateau de score et des cases de départ

Mise en place
Placez le plateau de jeu sur un côté de la table de sorte que les cases de départ soient orientées vers le milieu de la table. Mélangez les tuiles Terrain et empilez-les en plusieurs piles, face cachée, afin que tous les joueurs puissent y accéder facilement [1].
Chaque joueur prend les 6 colons de sa couleur et en pose un comme pion de score dans la grande case « 0 » de la piste de score. Chaque joueur pose ses 5 autres colons devant lui sur la table (l’aire de jeu) comme réserve personnelle.
Posez les deux arpenteurs sur les cases de départ situées aux extrémités opposées du plateau de jeu [2].
Le plus jeune joueur décide qui commence le jeu [3].
Déroulement d’une partie
Les joueurs jouent à tour de rôle dans le sens des aiguilles d’une montre, en commençant par le premier joueur. À son tour, le joueur exécute dans l’ordre les actions suivantes :
- Le joueur doit piocher et placer une nouvelle tuile Terrain.
- Le joueur peut poser un des colons de sa réserve sur la tuile Terrain qui vient d’être placée.
- Si, en plaçant la tuile Terrain, les fermes, les sentiers et/ou les villes sont complétés, ils sont alors évalués.
- Le tour du joueur est terminé et le joueur suivant, dans le sens des aiguilles d’une montre, commence son tour de la même manière.
Ces actions sont décrites, de manière plus détaillée, dans les sections ci-dessous.


Placement d’une tuile
First a player must draw a land tile from one of the face-down stacks. After looking at it, it should be shown to the other players (so they can advise on the "best" placement of the tile), and then placed on the table, using the following rules:
- The new tile (shown with red borders in the examples) must be placed with at least one edge next to one previously placed tile or next to one of the starting spaces on the game board. [4] [5] The new tile may not be placed corner to corner with a previous tile or starting space.
- The new tile must be placed so that all plains, town, and trail segments on the new tile continue plains, town, and trail segments on all touching tiles.


In the rare circumstance where a drawn tile has no legal placement (and all players agree), the player discards the tile from the game (into the box) and draws another tile to place.
Pose d’un colon
After the player places a land tile, he/she may deploy one of their settlers, using the following rules:
- The player may only play 1 settler on a turn
- The player must take it from his supply
- The player may only deploy it to the tile just placed
- The player must choose where to deploy the settler on the tile, either as a:


- The player may not deploy a settler on a plains, town, or trail segment if that segment connects to a segment of the same feature on another tile (no matter how far away) that already has a settler (from any player, including the active player) on it. See the following examples.


When a player has deployed all of their settlers, they continue to play land tiles each turn. Although a settler may not be recalled, settlers are returned to players when farms, trails, and towns are scored.
The player’s turn is over and the next player in clockwise order takes their turn, and so on.
Remember: if, through the placement of the tile, towns, trails, and/or farms are completed, these are scored before moving on to the next player.
Évaluation d’une zone
Une piste complétée

A trail is complete when the trail segments on both ends connect to a crossing, a town segment, or a farm, or when the trail forms a complete loop.[7] The trail may have many segments between its ends.
The player who has a robber on a completed trail scores one point for each tile in the completed trail (count the number of tiles; separate segments on a tile count just once) and 2 points for each trading post along the trail.
The player moves their scoring marker forward on the scoring track a number of spaces equal to the points earned. If you pass 50 on the scoring track, lay your scoring marker down to indicate a score greater than 50 and continue along the track.
 RED earns 3 points |
 RED earns 8 points - 4 for the trail and 4 extra for the 2 trading posts |
Une ville complétée

A town is complete when the town is completely surrounded by a town wall and there are no gaps in the wall. [8] A town may have many segments.
The player who has a shopkeeper in a completed town scores two points for each tile in the town (count the tiles, not the segments). Each flag on segments in the town earns the player 2 points.
 RED earns 8 points - 3 town tiles and 1 flag. |
 RED earns 8 points - 4 town tiles, and no flags. |
When a tile has 2 segments in a town, it still counts for just 2 points (1 tile). |
What if a completed town or trail has more than one settler? It is possible through clever placement of land tiles for there to be more than one robber on a trail or more than one shopkeeper in a town. In a completed trail or town, the player with the most robbers (on a trail) or the most shopkeepers (in a town) earns all the points.
When two or more players tie with the most robbers or shopkeepers, they each earn the total points for the trail or town.
Une ferme complétée

A farm is complete when the tile it is on is completely surrounded by land tiles. The player with a farmer in the farm earns 9 points (1 for the farm tile and 1 each for the other tiles).

Après l’évaluation
After a trail, a town, or a farm is scored (and only then), the settlers involved are returned to the appropriate players' supplies. The returned settlers may be used by the players as any of the possible settlers (robber, farmer, shopkeeper, or farmer) in later turns.
It is possible for a player to deploy a settler, score a trail, town, or farm, and have the settler returned on the same turn (always in this order):
- Complete a town, trail, or farm with the new tile
- Deploy a shopkeeper, robber, or farmer
- Score the completed town, trail, or farm
- Return the shopkeeper, robber, or farmer to player's supply
 RED earns 4 points.
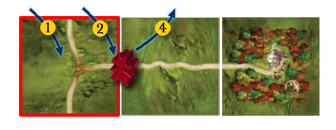 RED earns 3 points.


Arpenteurs : leurs avantages et les limites qu’ils imposent
After each feature is scored (there may be more than one in a turn), the player whose turn it is moves one surveyor one column to the west (away from the coast). It doesn't matter which tile the player places the surveyor on as long as it is in the correct column. The player must move the eastern-most surveyor if the surveyors are not in the same column. Thus, the two surveyors will never be more than one column apart in their westward trek. If the surveyors are both in the western-most column of tiles (no tiles to their west) neither moves. They will remain there until a feature is scored and there are tile(s) to their west. If a feature is completed, but not scored, the player does not move a surveyor. If there is only one tile in the westernmost column, both surveyors may share that space.
Bonus d’évaluation
When a settler is scored that is standing on the same column with one (or two) surveyor(s), the player scoring the settler gets +4 points for each surveyor! (note: a surveyor is moved after the settler is scored!)
Enlever les colons à la traîne
When a surveyor is moved west remove any standing settlers (not trappers - they remain lying down until the end of the game) from any columns to the "east" of the eastern-most surveyor and return them to their owners without scoring. [9] A player may place a settler on a just-placed tile in columns "east" of the surveyors, but it is dangerous as such a settler (not a trapper) will be removed immediately after the next scoring! [10]
 In the first few turns the players played the settlers as shown in the graphic and scored the 2-tile trail on the north, removing the settler there and moving the top-most surveyor. Now, YELLOW (1) places the red-bordered tile and (2) her settler on the trail leading south. She scores her completed trail for 10 points (4 tiles + 1 trading post + 1 surveyor), (3) removes her settler from that trail and (4) moves the bottom-most surveyor westward one tile. |
 Next, BLUE (1) plays the red-bordered tile and (2) his settler on the small town, completing three features: * RED's city to the north * BLUE's farm, and * BLUE's small town BLUE scores his farm for 17 points (9 + 2 surveyors), (3) removes his settler from the farm, and (4) moves the top-most surveyor. Then, he scores his small town for 8 points (4 + 1 surveyor), (5) removes his settler from the town, and (6) moves the bottom-most surveyor, (7) forcing the GREEN and RED settlers out of the surveyor-vacated column. Thus, the "Red" town is not scored, as the RED settler is no longer there! |
Les Plaines
Connected plains segments are called plains. Plains are not scored if completed during the game. Players may deploy trappers on plains segments, but they only score at the end of the game. A trapper remains in the plains segment where it is deployed for the entire game and is never returned to the player's supply! To emphasize this, place the trapper on its side on the plains segment. Plains are bordered by trails, towns, and the edge of the area where the land tiles are played.
Fin de partie
At the end of the player's turn during which the last land tile is placed, the game ends. If the player completes one or more features, these are scored as normal and then the game proceeds to the final scoring.
Évaluation finale : Sentiers, Villes et Fermes incomplets
For each incomplete trail and town, the player, who has a robber on the trail or shopkeeper in the town, earns one point for each trail or town segment (instead of 2 points). Flags (in towns) are worth 1 point each (instead of 2 points), but Trading Posts (on trails) are still worth 2 points. [11]
For incomplete trails and towns with more than one settler, use the rules for completed trails and towns to determine who scores.
For an incomplete farm, the player with the farmer on the farm earns 1 point for the farm and 1 point for each land tile surrounding it.

YELLOW earns 5 points for the incomplete farm.
BLUE earns 3 points for the incomplete town on the lower right.
GREEN earns 8 points for the larger incomplete town on the left.
BLACK earns nothing, as GREEN has more shopkeepers in the town than BLACK.
Évaluation finale : Trappeurs (pour les animaux des plaines)

Tip: To make plains scoring easier, remove settlers as you score the unfinished trails, towns, and farms.
In each plains area at the end of the game, the player with the most trappers in the area scores 1 point for each animal shown on plains segments in the area - there is no difference between the animal types. As with trails and towns, if several players tie with the most trappers in the area, each scores 1 point for each animal shown on the plains segments in the area.
When all completed plains areas are scored in this way, the scoring and the game is over.
 RED earns 3 points. BLUE earns 2 points. |
 RED earns 4 points for the animals in the lower plains area, as he has 2 trappers in the area to YELLOW's 1. BLUE earns 2 points for the animals in the upper plains area. |
 In this example, RED and YELLOW each earn 4 points for the animals in the lower plains area, as each has 2 trappers in the area. BLUE earns 5 points for for his trapper in the upper plains area. |
The player with the most points is the winner. If players tie with the most, they rejoice in their shared victory.
Ensemble des tuiles
Total des tuiles : 95
 ×2
×2 ×3
×3 ×3
×3 ×2
×2 ×1
×1 ×1
×1 ×1
×1 ×3
×3 ×2
×2 ×1
×1 ×4
×4 ×3
×3 ×1
×1 ×3
×3 ×2
×2 ×3
×3 ×4
×4 ×4
×4 ×1
×1 ×1
×1 ×3
×3 ×1
×1 ×1
×1 ×1
×1 ×1
×1 ×3
×3 ×2
×2 ×1
×1 ×2
×2 ×2
×2 ×1
×1 ×1
×1 ×2
×2 ×3
×3 ×1
×1 ×3
×3 ×3
×3 ×1
×1 ×3
×3 ×2
×2 ×1
×1 ×1
×1 ×1
×1 ×1
×1 ×1
×1 ×3
×3 ×1
×1 ×2
×2 ×1
×1 ×1
×1Verso des tuiles :

Règles non officielles
Place one surveyor on the start board, and the other on the 0 space of the scoring track. When the first trail, town or farm is completed, move the surveyor from the 0 space to the 1 space on the scoring track. Repeat from 1 to 2, 2 to 3, until he reaches space number 5, at which point he is placed on the game board, in any of the starting spaces (as described under preparation, above. Thereafter, the surveyors move, as described, when features are scored. (from BGG)
Crédits
Cette page est principalement basée sur les règles du jeu New World publié par Rio Grande Games avec des révisions mineures des règles et des images adaptées des règles originales du jeu Mayflower de Hans im Glück où il y a eu quelques variations entre les sources. Des commentaires et des clarifications supplémentaires sont venus de divers forums de discussion sur Carcassonne (BGG, CarcC et CarcF).
Notes
Pour les licences et les explications des icônes, veuillez visiter la page des icônes.
- ↑
 Vous pouvez aussi utiliser un petit sac, si vous en avez un à disposition.
- ↑
 Cette phrase est différente dans les règles anglaises, où les deux arpenteurs n’ont pas d’emplacement de départ prédéfini :
« Posez les deux arpenteurs sur deux des cases de départ du plateau de jeu – peu importe lesquelles. »
Cette phrase est différente dans les règles anglaises, où les deux arpenteurs n’ont pas d’emplacement de départ prédéfini :
« Posez les deux arpenteurs sur deux des cases de départ du plateau de jeu – peu importe lesquelles. »
- ↑
Cette phrase est différente dans les règles anglaises, où les joueurs collaborent pour décider quel sera le joueur qui commencera :
« Les joueurs décident entre eux qui sera le premier joueur, en utilisant la méthode de leur choix. »
- ↑ If placing a tile against the game board, it must be placed to the west of the ten starting spaces, and not against the northern or southern edge.
- ↑
 Later tiles may be placed beyond the northern or southern edge of the game board, but only to extend the already laid tile landscape, not the game board itself. If the landscape extends north or south of the game board and contains any tiles in the first column of landscape tiles, subsequent tiles may not be placed eastwards (back towards the sea).
- ↑ In the original Hans im Glück rules for Mayflower, this settler was the "Sheriff".
- ↑ By implication in a response from HiG that the "tile spaces" on the starting board are to be included for scoring purposes, this thus includes the trail that ends at the sea on the start board.
- ↑ By implication in a response from HiG that the "tile spaces" on the starting board are to be included for scoring purposes, this thus includes the coastal towns of New York and Jamestown.
- ↑ The RGG rules stated "Whenever the eastern-most surveyor is moved west ..." but this has been clarified as unclear on BGG although it could be argued that if both surveyors are in the same column they could both be considered "easternmost", and if in different columns, then the easternmost one must be moved. Therefore it implies it is each time!
- ↑ There is nothing to stop a player placing a tile to complete a feature east of the surveyors, placing a settler on it and immediately scoring, as the surveyor moves after the scoring has taken place and the settler returned to the player's supply.
- ↑ Although not specified in the main RGG rule, Trading Posts are listed in the Scoring Summary at the foot of the last page.